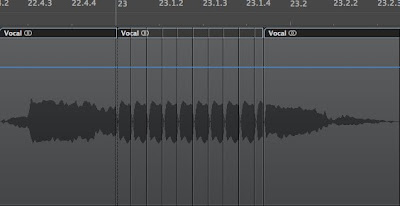
 Recently, I was sent a track to remix where the vocal track already had effects on it. In an ideal world, I prefer to get dry vocals so that I have maximum flexibility to mess with them once I have my mix built. But, that's not always what you get, so you have to be adaptable. I thought it might be fun to add some stutter edits to the vocal, and as it happens, this is dead easy to do in Logic.
 1. Load up the vocal in question and give it a listen through. There's different types of stutter edits, but the kind I was after here are the type where a sustained portion of the vocal stutters in a buzzy, almost mechanical way, as if you took the vocal into a sampler and placed a tight loop on part of it. It sounds a bit glitchy and robotic. So what you are looking for, are portions of the audio where the singer holds a note, which nearly all the time is a vowel.
2. Find the first eligible point you wish to apply this effect to and select the Scissors tool. Make a cut at the beginning and end of the sustained portion. Be careful with your selection here. For the best results, you want to get only the vowel portion and none of what comes before or after, so zoom in as much as you need to in order to see the waveform more clearly.
3. Now, within the area you just made the cuts, move your cursor to the bottom righthand corner of the region and the cursor should change to what looks like a bracket with little arrows on either side of it. This tool lets you adjust the length of a region simply by clicking and dragging on it. So that's what we're going to do. Click in the bottom right of the region and drag to the left so that you are changing the end point of the region.
4. You should now have a big, empty space where the rest of the region used to be. Let's fix that. Making sure you still have the region whose length you just adjusted selected, head over to the region parameters box to the top left of the Arrange Page. (It should have the same name as the region you're working with and have options for Loop, Fade In, Curve, etc.) Click the loop box and you should see the previously empty area now filled with small, gray copies of your region.
5. Play it back, and you should hear the sustained portion 'stuttering' now. At this point, you will probably want to play around with adjusting the length of the region (and thus the loop length) to get just the right effect. If it's too short, pitched regions won't play back at the right pitch, and at extreme settings, you won't hear anything as it goes out of the range of hearing. Just click and drag on the bottom right hand portion of the region like we did before and resize the region until it sounds the way you want it to. You'll notice the gray loops of that region will also change size accordingly.
And there you have it - a kind of cool technique that took virtually no effort. As with any technique, experimentation is encouraged, and you need not only apply it in the way I talked about. Try stuttering different portions of words, try it on guitars or drums... try it on everything!


No comments:
Post a Comment