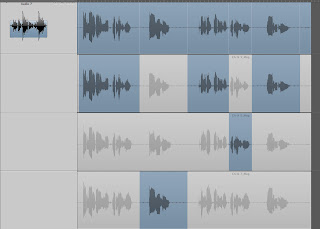
 One of the most commonly used techniques professionals use when recording vocals is something called "comping". Comping entails using several different takes of a vocal (or guitar solo, or basically any part where human error and imperfection enters the equation) to build one ideal track from all the best bits. If you've ever recorded an almost perfect vocal and had it messed up by a phone ringing, a bum note, a cough, or whatever, you can see why this is a very valuable time-saving technique.
Apple introduced 'easy swipe' comping in Logic Pro 8
1. If you haven't recorded your vocal yet, set-up a section of the song to cycle by clicking and dragging over the relevant section at the top of the timeline in the Arrange page. Be sure to give yourself at least 4 bars before and 4 bars after the section that is to contain the vocals. Now, when you hit record and complete your first take, don't stop it! Logic will automatically loop back to the beginning of the cycle region you set up and allow you to record your next take. It'll repeat this for however many takes you want to do (I usually like to have 3... more if it's a particularly difficult vocal). Don't worry - you're not recording over the previous takes! Logic automatically creates a 'take folder' containing all the takes you just recorded. Although it appears as a single audio file in the Arrange page, you'll note at the beginning of it there is a small triangle. Clicking this triangle opens up the take folder and allows you to see all the takes you just recorded.
2. If you already recorded your vocals as separate audio files, or if you received someone else's vocal recordings, no problem - you can still do this. Just hold down the shift key and select all the vocal tracks you want to comp. Now go up to the Region menu in the Arrange page and select: Region->Folder->Pack Take Folder. Your multiple files are now set up in a take folder!
3. Now it's time to build your comp. If you haven't already, click on the triangle at the beginning of your take folder to reveal all the various takes at once arranged in the following manner: the top audio region represents the composite itself, and all the other regions below it are your actual takes which will make up the composite. It's useful at this point to expand the size of the tracks so you can more easily see the waveform of the audio. You can do this by clicking and dragging in the lower lefthand corner of the track header itself.
4. Go to the first verse in your song and set up a cycle region by clicking and dragging the length of your verse in the top of the timeline. Press play, and your verse will begin repeating over and over until you hit stop.
5. Be sure to solo your vocal track here so you can more easily hear any imperfections.
6. When you find one, click and drag over it on one of the alternate takes until you find one to your liking. Remember, the top region is not one of your takes, it represents the final comp, so don't click and drag on it. When you've selected the best bits from your various takes, you'll notice thin white lines on the top region, indicating the edit points in your comp. You should have something resembling the picture above where the blue regions indicate the parts making up your comp, and the greyed out regions are the parts not being used.
7. Continue this process with the rest of your song, one section at a time, until you have a comp you are happy with.
8. At this point, all you really need to do is to click on the triangle you used to open your take folder to close it again, but I prefer to 'flatten' the comp so I can't accidentally screw up my comp later on. To do this, scroll to the end of your comp's audio region and you'll see a circle with a downward pointing triangle. Clicking on this brings up a special menu. Simply select 'flatten' and you're good to go. (Of course, soloing and bouncing the track into a new file will work as well).
Can you believe how easy that was?


1 comment:
This cannot have effect in actual fact, that's what I think.
Post a Comment