 When it comes to sequencing, there are basically 2 types available to you in most DAWs. "Real Time" sequencing involves physically playing a musical part into the sequencer. The alternate is "Step Time" sequencing, in which notes are played or drawn on a grid one at a time (or knobs are turned/sliders slid on an analog sequencer). Back in the early days of electronic music, step time was your only option if you wanted to program a sequencer and the sound of electronic music in that time period is at least partially a result of the use of this method. The driving synth lines of Giorgio Moroder, the robotic precision of Kraftwerk, and even the chaotic basslines of early EBM bands like DAF all owe their sound to the method in which they were programmed.
Indeed, a lot of people still use step time, but because it is a bit more intuitive and less work intensive, most people who are able to play do their sequencing in real time these days. If that's the case, have a try programming some parts in step time. You may be surprised at how different the results are from your usual music.
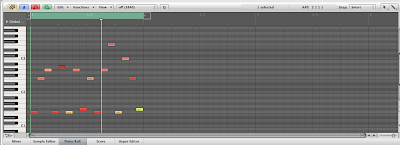
In Logic, you have two basic ways of step programming. The first involves opening the Piano Roll Editor and simply drawing notes on the grid. This is probably most useful for drum programming, but it can be a lot of fun to experiment with on melodic material too, if you're not used to it. The second method involves actually playing the notes on your controller, one at a time. Here's how to do it in Logic:
1. Create a new Software Instrument Track and assign your favorite soft synth to it. Select the Pencil Tool and click somewhere on your Software Instrument Track in the Arrange Window to create a new region.
2. Double click on the new region to open the Piano Roll Editor.
3. At the top of the Piano Roll Editor window, you'll see a row of four buttons to the left of the Piano Roll menu bar. The rightmost of these two have an image of a MIDI outlet, one marked IN and one marked OUT. Click the IN button until it turns red. This allows you to enter notes in the Piano Roll grid from your MIDI controller.
4. Make sure your playhead is at the beginning of the grid in the Piano Roll Editor and play a note on your keyboard. You should see your note appear on the grid and the playhead advance by one note. What note value this is depends how you have your note value is set on the transport bar. You'll find it right beneath the time signature. It defaults to /16 for sixteenth notes.
5. Once you've programmed in a bunch of notes, press the space bar to hear what you've just created. Maybe it's something kind of cool, or maybe it's terrible, but either way, you should experiment with changing the pitch of individual notes, deleting notes here and there, changing the timing and so on until you find something cool.
Taking this sort of 'blind' approach to programming can lead you to much different places than you might have gone if you tried playing the same part in real time. And likewise, if you're not much of a player and have always entered notes on a grid, have a go at playing stuff in real time. You don't have to be perfect, that's what quantize is for! So which do you prefer? Real time, step time, or a combination of both for specific purposes?


2 comments:
Predominantly step time, more often than not drawing in notes by hand. For variation, or mainly for melodies, I'll play real time. You're right though, I should vary my method though, so I think today I'll try to see if Live does the single note advance too.
In the past week I've been "studying" Ableton. I've been using it for nigh on 5 years and I had never used the session screen till now. I have to admit, it's opened up new worlds, and given me some enthusiasm for making music which had been waning somewhat.
Paul
i used step record all the time back in the day with cakewalk. it's always a easy way to come up with some new random stuff. i still wish ableton had that option.
Post a Comment