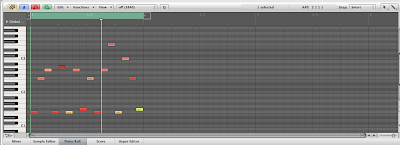
 When it comes to sequencing, there are basically 2 types available to you in most DAWs. "Real Time" sequencing involves physically playing a musical part into the sequencer. The alternate is "Step Time" sequencing, in which notes are played or drawn on a grid one at a time (or knobs are turned/sliders slid on an analog sequencer). Back in the early days of electronic music, step time was your only option if you wanted to program a sequencer and the sound of electronic music in that time period is at least partially a result of the use of this method. The driving synth lines of Giorgio Moroder, the robotic precision of Kraftwerk, and even the chaotic basslines of early EBM bands like DAF all owe their sound to the method in which they were programmed.
Indeed, a lot of people still use step time, but because it is a bit more intuitive and less work intensive, most people who are able to play do their sequencing in real time these days. If that's the case, have a try programming some parts in step time. You may be surprised at how different the results are from your usual music.
In Logic, you have two basic ways of step programming. The first involves opening the Piano Roll Editor and simply drawing notes on the grid. This is probably most useful for drum programming, but it can be a lot of fun to experiment with on melodic material too, if you're not used to it. The second method involves actually playing the notes on your controller, one at a time. Here's how to do it in Logic:
1. Create a new Software Instrument Track and assign your favorite soft synth to it. Select the Pencil Tool and click somewhere on your Software Instrument Track in the Arrange Window to create a new region.
2. Double click on the new region to open the Piano Roll Editor.
3. At the top of the Piano Roll Editor window, you'll see a row of four buttons to the left of the Piano Roll menu bar. The rightmost of these two have an image of a MIDI outlet, one marked IN and one marked OUT. Click the IN button until it turns red. This allows you to enter notes in the Piano Roll grid from your MIDI controller.
4. Make sure your playhead is at the beginning of the grid in the Piano Roll Editor and play a note on your keyboard. You should see your note appear on the grid and the playhead advance by one note. What note value this is depends how you have your note value is set on the transport bar. You'll find it right beneath the time signature. It defaults to /16 for sixteenth notes.
5. Once you've programmed in a bunch of notes, press the space bar to hear what you've just created. Maybe it's something kind of cool, or maybe it's terrible, but either way, you should experiment with changing the pitch of individual notes, deleting notes here and there, changing the timing and so on until you find something cool.
Taking this sort of 'blind' approach to programming can lead you to much different places than you might have gone if you tried playing the same part in real time. And likewise, if you're not much of a player and have always entered notes on a grid, have a go at playing stuff in real time. You don't have to be perfect, that's what quantize is for! So which do you prefer? Real time, step time, or a combination of both for specific purposes?
 Yesterday we had an analog sequencer, today we have a boxy, digital one with a couple of mods...Info at the listing...
 I really hope to pick up an analog sequencer some day. I've played around with them in Reaktor and love the unpredictable results you can get from them, but the real deal would definitely be more satisfying. If you're looking for one yourself, this one by Doepfer seems to be very highly regarded...Check out the listing...
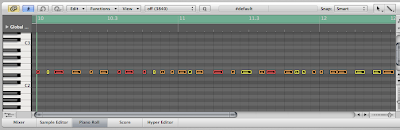 As much as we all love synthesizers, samplers and other electronic noise makers, I think if we're honest, we have to admit that one area electronics often are lacking, is in expression. Of course, there are numerous ways to add expression, but even with these, it is tough to match the vast variety of sounds that, for example, a skilled guitarist has at his disposal. They can mute notes, play harmonics, slide, bend, pluck, or if you're Jimmy Page (and you're not), even play it with a violin bow. There are some ways to liven up synth lines, however, and today we're going to look at varying a note's gate time to add more of a groove to it.Gate time simply refers to how long a note is held. If you listen to a really good funk rhythm guitarist, you'll notice that they add rhythmic drive to their parts by interspersing short, muted notes with more sustained ones. This essentially imitates the way a drummer's hi-hat works - when the hi-hat is closed, the sound is short and sharp, and when it is open, the sound sustains more. The drummer adds rhythmic interest by alternating between these two sounds in a musically meaningful way. Since you're a smart bunch, I'll assume you see where I am going here - we can add groove and rhythmic drive simply by varying the gate times of the notes. Here's how to do it:1. The most important part is that you need a sound with no release to it. In other words, the sound cuts off sharply when you release the keys versus one that fades out more gradually. A Hammond Organ or a Clav sound would be a good example. Most synth basses fit this description as well.2. This technique works best with 16th notes, so play or step program a bassline with straight 16th notes.3. Quantize that mutha. (You can skip this if you step programmed).4. Now open up the riff you just played and quantized in your DAW's 'piano roll' note editor. In Logic 8 , simply double click on the riff in the arrange area.5. You should be able to alter the lengths of the notes by dragging the end of the little blocks that represent them. To start out, set them all so they are exactly one 16th note in length. No shorter, and no longer. If your bass sound is monophonic, make sure these notes don't overlap. If you step programmed, you can skip this too, as your notes should already be of a uniform length.6. Now picture a hi-hat pattern in your head. Something that alternates closed and open hats in an interesting way. Start with something simple. Now, every time there is an open hat sounding in your imaginary hi-hat pattern, we'll leave the gate length as it is. But all of the notes that line up with the closed hat in your imaginary pattern we're going to shorten. You can do this by dragging the note ends until they about one 32nd note in length (half the length of the other notes, in other words).If you done everything correctly, you should have something more dynamic and interesting than what you started with. It takes practice to figure out which notes to lengthen and shorten, but imagining the hi-hat pattern helps. If you want to make it even easier, program the hi-hat pattern into your sequencer to play along with the notes so you have an audio reference point to match it exactly. When you're done, you can simply erase the guide hi-hat track.Below is a quick and dirty example. The first example features no gate variation at all, the second uses the technique detailed above, and the third also uses that technique, but also adds swing to the quantization to make it groove even harder.
 When it comes to sequencing, there are basically 2 types available to you in most DAWs. "Real Time" sequencing involves physically playing a musical part into the sequencer. The alternate is "Step Time" sequencing, in which notes are played or drawn on a grid one at a time (or knobs are turned/sliders slid on an analog sequencer). Back in the early days of electronic music, step time was your only option if you wanted to program a sequencer and the sound of electronic music in that time period is at least partially a result of the use of this method. The driving synth lines of Giorgio Moroder, the robotic precision of Kraftwerk, and even the chaotic basslines of early EBM bands like DAF all owe their sound to the method in which they were programmed.




 Posts
Posts


