The steady tempo of drum machines and sequencers is a bit of a double-edged sword. On the one hand, the absolute, unforgiving precision can sound absolutely fantastic. Would Donna Summer's "I Feel Love
On the other hand, the constant, unerring tempo of sequencers can get a little dull now and then. Even the best drummers in the world can't help but vary the tempo of what they're playing slightly just because they're human, and this is part of what separates purely electronic music from more organic forms. But you don't have to be a wannabe rock band to make use of tempo changes in your music. Having an intro where the music starts slowly and quickly builds up to the main BPM of the track can be a very cool way to start a song. Likewise, having a song slow down at the end can sound really cool and dramatic. So today, I'll show you how to mess around with this in Logic. (Most other DAWs will allow you to do this too - just check your manual!)
1. Open up Logic and create an AUDIO INSTRUMENT track. Assign an instance of the Ultrabeat drum machine to it.
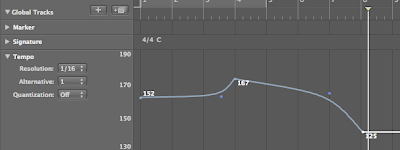
2. At the top of the ARRANGE page, you'll see the text "GLOBAL TRACKS" with a disclosure triangle next to it. Click on the triangle and you'll reveal (duh) the GLOBAL TRACKS. You'll see tracks for MARKER (for inserting text notes on the timeline), SIGNATURE (for making changes in the time signature throughout a song should you decide to pretend you're Rick Wakeman), and TEMPO. We're interested in the TEMPO track, so move your cursor to the dividing line right below the name of the track and it should change to a line with an arrow above and below it. Click and drag downward to expand the window.
3. Right now, you should see a straight line at whatever tempo your project is set for (120 BPM by default). You can change the tempo of the entire track easily by dragging this line up or down. However, we want the tempo to change throughout the course of part of the track. To do this, move to the point were you want your tempo change to be complete. Now, double click either below or above the center line depending on whether you want your tempo to increase or decrease.
4. The tempo change will be created, but it will create an instantaneous change. While there is nothing saying you can't do this (and indeed, if you're doing soundtrack work where musical elements might need to match precise visual points, this can be very useful), this is very unnatural and doesn't reflect the way real musicians change tempo. To create this, drag the middle node. (There will be a node at the at the original tempo, one in the corner of the right angle you just created, and a third at the new tempo... you want the middle one.) By moving this node up or down and back and forth, you can create literally any kind of curve or even a straight up or down angle between the tempos. This will make the change more gradual and much more musically pleasing.
5. Make sure Ultrabeat's sequencer is turned on and go ahead and hit play on the TRANSPORT BAR to hear the results. Tweak as necessary. Keep in mind you can always add or subtract nodes to get changes of varying levels of complexity.
I realize this seems sort of like a special effect thing you might not do that often and in general, you're right. One cool application you can use it for on any track, however, is to imitate the way a real band tends to play the chorus of a song slightly faster than the rest of the song. We're only talking about a varation of a few BPM here, but it can really add energy to your choruses in a nicely subtle way. Plus, it will piss off DJ's trying to beat match and it's hard to deny the fun in that. ; )


8 comments:
Handy tip. Thanks.
About the whole DJ comment, on more than one occasion I have opted to not play a song because of a jump in tempo (whether programed or from a "real" band).
Similarly with remixes, a vocal in more than one tempo is going to piss people off. I recently did a remix of Alanis Morissette's Not As We. The track was just vocal and piano, no click. I had to nudge each phrase wildly from tempo to tempo to fit. Clearly with a DAW, it would be more straightforward than this but it's a bitch and all too often, the remixer doesn't get the proper instruction.
If your music isn't aimed at dance music or remixes, then by all means go for it. I just know from experience on the wrong side of this scenario, how much of a bitch this can be.
-Tom N
A lot to be said about labeling tempos in general on the remix kit. I don't think anyone really enjoys spending the first minutes of the session doing something that a few keystrokes could have accomplished.
please stop talking about logic audio as it only drives me insane that i cannot run logic on my pc anymore!!! :) :)
Hi Tom
Sorry if the tempo changes in "Not As We" gave you so much trouble. The album version of the song was edited from two vocal-plus-piano takes, which just had great emotional vocals. Neither was done to a click, and the second was performed, on average, a bit faster than the first. Editing them together probably increased the tempo disparities even further.
We later did a shorter "radio" version to a click, but a flexible one with lots of accelerations and retardations. I don't know if that's the one you worked from.
Tempo changes are a nightmare for a remixer. I did a remix for Mirah of a song that had no click, and it took two days work just to get her vocals to sound right against any kind of fixed cyclical rhythm. But I loved the result.
Sometimes it's creatively exciting to work with fluid tempos, even when they're clocked from a machine. I produced the Britney Spears song "Everytime", and every bar of that song has a slight acceleration from the first beat to the third, then a slight retard from the third to the end of the bar. Bars at the ends of sections have a bigger accel-retard than the "default" one. Producing the song that way meant a lot of extra work, but it gave it a particular character. It took it away from "programming suite ballad" territory, made it more mysterious.
- Guy Sigsworth
i like the phrase 'accel-retard'
:)
thats a good band name, accelaretard
Wow, nice to have your comment here, Mr. Sigsworth!
I agree that remixing stuff with drifting tempo can be a pain, but between things like Live's warp markers, Melodyne's timing correction, and most DAW's tempo mapping features, it definitely is a lot easier than the old days when producers would have to manually ride the tape speed to attempt the same thing! Give it a couple years and your DAW will probably do this stuff automatically while it's making your coffee. :)
It can't actually work, I believe so.
Post a Comment