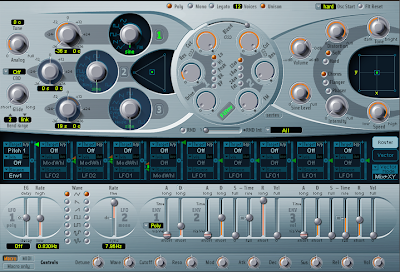
Logic's included ES2 synth is seriously underrated, especially given how old it is. I think a lot of people were put off by the kind of odd interface, and that's a shame because there is an amazing amount of firepower in this synth if you take the time to learn how to use it. Today, we're going to make a hard techno kick drum using ES2. Note, however, that you should be able to follow along with just about any modern virtual analog softsynth.
1. Create an AUDIO INSTRUMENT track and initiate an instance of ES2 in it. ES2 defaults to a very nice sounding synth sweep, but this is a bit far removed from the sound we're trying to create, so call up the preset CLASSIC HOUSE ORGAN from the 05 SYNTH KEYBOARDS folder.
2. We're only going to need one oscillator for our kick drum, so go ahead and disable OSCILLATORS 2 and 3 by clicking by clicking on the numbers next to each one until they go from green to grey. OSCILLATOR 1 is a simple sine wave, which is handy, because the lowly sine is the most useful waveform for synthesized kick drum sounds.
3. Before we get too far into this, let's deactivate some of the modulation routings we won't be needing. The MOD MATRIX is right below the OSCILLATOR section. In slots 2-4, go ahead and change the TARGET to 'OFF'. With that done, go to slot 1 and change the TARGET from CUTOFF to PITCH 1. This is telling ES2 that we're going to want to change the pitch of OSCILLATOR 1 with a modulator of some sort (the SOURCE). Right now it's set to ENV 2, but in the interest of keeping things simple, we're going to change it to ENV 1. ENVELOPE 1 is a simple attack/decay envelope which is very well suited for percussion sounds. If you play a few keys, you won't hear any modulation taking place. This is because you still need to set a MODULATION AMOUNT by using the green slider to the right of the SOURCE/TARGET window. Go ahead and set it around 89% of the way up. If you play some keys now, you'll hear a percussive 'chirp' at the start of the sound.
4. The sound doesn't decay like a drum, though. It still sustains like an organ. So go to ENVELOPE 3 (which is the AMPLITUDE ENVELOPE), and bring your S (for SUSTAIN) and TIME values down to 0. Go ahead and make sure the A (ATTACK) value is all the way down too. Set the D (DECAY) level to around 240ms and your R (RELEASE) value to around 350ms.
We're getting there, but it still doesn't sound like a big, menacing kick drum yet.
5. Part of the reason is because the pitch is too high. So go ahead and change the OCTAVE setting for OSCILLATOR 1 down to -36 semitones (3 octaves down). You should have something similar to a kick at this point, but totally lacking the nasty attitude.
6. Remedy this by cracking the SINE LEVEL (a suboscillator useful for adding low end to sounds) and the DISTORTION level all the way up. Set the TONE of the DISTORTION to about 50% to brighten it up. Make sure to turn the INTENSITY level for the Chorus/Flanger/Phaser all the way down too.
7. We're pretty close at this point, but you may notice an inconsistency in the punch of the kick each time you hit it. This is because the OSCILLATOR is in FREE RUN mode. This is useful for emulating old analog synths, but not so much when it comes to drum and percussion sound. To achieve the same quality every time, we need the OSCILLATORS to restart every time we hit a key, so select HARD from the little drop down menu located above the DISTORTION dial.
If you've done everything correctly, you should hear something like this:


3 comments:
couldn't you just load an 808 kick sample and add some distortion?
p.s. i became a Propellorheads Record beta tester this week- and it is AMAZING ! (well for a non-professional such as myself's needs)
Of course, but isn't it more fun to make your own, that you can customize to your exact needs? : )
Here, I don't actually consider it is likely to have effect.
Post a Comment