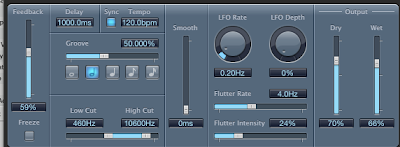
When most of us sit down to create new sounds, we mainly think about programming a synth from scratch to match the sound we're imagining in our heads. One thing I've really enjoyed in recent years, however, is concentrating more on using effects to create new sounds. In fact, I wrote a post about this very subject a couple of years ago. Using effects as a manner of sound design is something that doesn't seem as common as it was back in the day when synths were more in need of effects to hold their own and that's a shame, because it really is a fertile source for drastically different sounds.
Today, I'll walk you through a technique that uses a tape delay effect (I'm using Logic's built-in Tape Delay, but any decently featured tape/dub delay should be applicable here) to create a grimey hit/stab sound.
1. Load up an instance of your favorite soft synth or sampler and find a sound that has the same general timbre as the hit you're looking to create. Sampled chords work great, or if you're working with a multi-oscillator synth, tuning the oscillators to an interval like a fourth, a perfect fifth, or a seventh is a good start. On the same channel as your synth/sampler, apply an instance of your favorite tape/dub delay effect.
2. Program a note or chord in your sequencer to trigger the synth/sampler.
3. Now comes the fun part. What you want to do here is to program the tape delay effect to feed back upon itself. Many tape delays, such as the one built in to Logic have a dedicated FEEDBACK parameter, so this is what you're looking for. With most tape delay effects, this basically controls the number of repeats created by the delay. Once you get past a certain threshold, however (depends on the effect, but it's usually somewhere around 52% or greater), the sound will feed back into itself and each generation of repeat will get progressively more distorted and farther away from the original sound. More extreme values will result in more extreme results. So go ahead and crank your FEEDBACK level to around 60%.
4. We're looking to let each repeat be easily isolated for sampling purposes, so go ahead and set your delay's note value to either a half or whole note, depending on what your delay plug-in of choice offers. Assuming your tape delay syncs to your DAW's master tempo, it can also be helpful to lower your BPM to provide still more space in between repeats to make the sounds still easier to isolate.
5. If your tape delay effect has a "flutter" type parameter to simulate the imperfections of actual audio tape, mess around with these, as they will further bastardize the source sound with each repeat. Mess around with the LOW CUT/HI CUT parameters too, assuming your tape delay of choice has it (it does, or your tape delay of choice sucks). This will make the sound get progressively darker or brighter with each echo and can further manipulate your source sound.
6. Next, go ahead and bounce out your track and make sure to give yourself enough space at the end for the sound to echo through several iterations... preferably 30 seconds to a minute or so.
7. Open up your audio editor of choice, load up the file you just bounced, and search for the echo that sounds the coolest to you. Isolate it, edit it down, and load it into your sampler of choice.
I would urge you not to think of this as your final sound, however. Manipulate the sound further using your sampler's filters, envelopes, LFOs and more and pile on yet more effects from your plug-in folder to take the source sound still further from its original incarnation. Bounce that out, re-import it to your sampler and repeat as necessary until you have something totally new and interesting...


1 comment:
Very cool tip. I'm going to it with pitch shifting and putting the feedback on a separate bus so that each degradation is a different pitch, giving me a multi-sampled patch with different sound for each note.
-Tom N
Post a Comment