 By now, you've probably heard of Sidechain Compression. This involves using the dynamics of one audio file to trigger the compressor on a different piece of audio. Usually, this involves using a kick drum to trigger the compressor on a pad or bass sound to make it 'pump' in time with the music. You can hear this technique all over the place in dance music these days, and used tastefully, it can be quite a cool effect.
Apple's Logic DAW was one of the first to allow sidechaining of effects, which helps explain its popularity among dance-oriented musicians. What a lot of people miss, however, is that some of Logic's built-in synths such as ES1, ES2, and Sculpture have the incredibly innovative ability to use a sidechain to modulate various synth parameters. This opens a whole new world in terms of modulation that is musically useful and dead easy to do. Here's how to try it yourself:
1. Open a new project and create one audio track and one software instrument track.
2. Import a drum loop and drag it onto your audio track. Go to the track's output assignment (you'll find this on the mixer channel for the track right above the track's name), and change it to 'No Output'. We want the drum loop to be used for the modulation, but not actually heard.
3. On your software instrument track, call up an instance of ES-2. Load the present 'Wheel Syncer' from the '01-Synth Leads' preset menu.
4. Go down to the modulation assignments section of the synth and count 7 slots over. You should see an assignment for modulating the Pitch of Oscillator 2 (the Target of the modulation) using the modwheel (the Source of the modulation). If you play a few notes and move the modwheel, you can hear how this assignment alters the characteristic 'ripping' sound most oscillator sync type sounds use.
5. Click on the modulation Source (in this case, 'ModWhl') and you'll be presented with a menu of various available modulation sources. At the very bottom, you should see a selection for 'SideCh'. Select this.
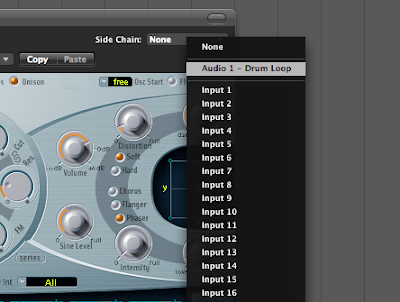
6. Now look up at the very top right corner of the plug-in window. You should see a menu for selecting you sidechain source. This defaults to 'None', but we want to change this to be the audio channel with our drum loop on it (most likely 'Audio 1' if you've started from scratch).
7. Now, press play on your sequencer and play a few sustained notes on the ES2. If you've set everything correctly, you should hear something like this:
Please note that your sequencer has to be playing for the effect of the modulation to be heard! The above is just a simple example, but you can modulate virtually anything on these synths using this technique which opens a whole new world of rhythmic textures. Experiment with using different sidechain sources too. Generally, audio with heavily pronounced transients produce the best results, but you need not limit yourself to just drum loops... try using speech as an interesting source as well.
UPDATED TO ADD: I should note that the sidechain modulation I am talking above is not in any way related to what Native Instruments somewhat confusingly also calls sidechain modulation on their Massive softsynth.


3 comments:
awesome awesome awesome stuff...thanks for putting this up!please, show some more tricks...like environment/vocal production techniques.
best,
theyellowchair
+1 Nice one, Great tut. Thanks for sharing.
Josef Horhay (Mix Engineer)
Acoostic Zoo - Recording Studios Brisbane.
Managing the best antivirus software be able to aid just before curtail the quantity of training operators basic. What is the best photo editing software
Post a Comment