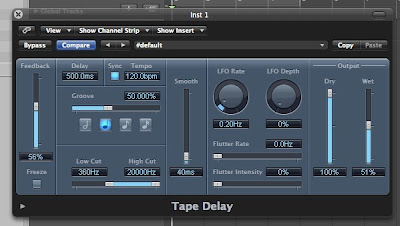
I do a lot of remixing and as such, I am always looking for new ways to come up with loops and rhythms that can enhance a track's danceability. Last year I did a remix for the AFI side-project Blaqk Audio in which I used a tape delay effect to create a rhythmic loop in the intro. This technique is actually quite an easy way to create unique, textured loops to your music and could just as easily be applied to non-dance forms of music (for example, using slow note values to contribute to an ambient piece...). I'm using Logic in the example, but you should be able to recreate the results in just about any DAW with a tape delay effect.
1.) Select a snippet of audio. This can be literally anything, but for best results you want something that has some rhythmic content to it such as a drum loop or a vocal. You only need about 1 bar's worth of material.
2.) On your effects inserts, insert a Tape Delay.
3.) The only tweak here that is absolutely required is to boost your feedback level to around 56 or so. This ensures that the delays will repeat over and over. Also set the note value of the delays to whole or half notes. You can use smaller divisions as well, but they don't yield useful results as often. Additionally, I usually like to tweak the high cut or low cut values so that each repetition evolves a little bit. Finally, make sure your project's tempo is the BPM of the project you are creating the loops for.
4.) Now bounce the audio. If you've set your feedback level correctly, it should repeat for just about as long as you want it to, so you should bounce out about 20 seconds or so to give yourself a variety of potential loops to choose from.
5.) Import the audio to the project you are using the loop for and assign it to a track. The bar lines on your DAW's timeline will now mark start and end points for possible loops. Go through and listen until you find a section you think has potential. Once you have, make cuts at the start and end point, delete the extra, and work with the loop as always. If your loop evolves a lot, there is no reason you can't use the whole piece too. Whatever works!
Below are two really quick and dirty examples. The first features delays created from a drum loop. There is a bar of the loop by itself, followed by a few bars over a beat and with sidechain compression applied for the pumping effect. The second was created from a snippet of vocals. Again, it starts with the loop by itself, and then goes over a beat with sidechain pumping, and some light tremelo for the auto-pan effect. Towards the end I added a little rhythmic filtering. Remember... this loop can just be the starting point for something. Don't be afraid to mangle it further with more effects.


No comments:
Post a Comment