 We really do live in an amazing time to be a musician. If you're only just now getting into making music on your computer, you may take for granted just how easy it is to achieve even very complicated effects. And don't even get me started on how many awesome, completely free effects there are out there. Back in the old days, if you couldn't afford the hardware, you couldn't have the effect. Period.
But with the ease of use, some of the old methods are forgotten, and I think that's a shame. So from time to time, I think it can be a valuable exercise to try things the old way... and I'll be honest, sometimes I think the old way is a lot more fun than just slapping on some random VST effect and calling it a day. A good example of this is rhythmic gating. Effects plug-ins that do this are a dime a dozen these days. Even some synths like the wildly over-used Vanguard have gating effects built right in. So I thought today we'd have a look at the way it used to be done back in the days when men were men (usually).
If you're unfamiliar with the effect, rhythmic gating is taking a piece of audio and having its sound cut in and out in a rhythmic fashion. If you've ever heard the 90's dance hit "You're Not Alone"
by Olive, you'll hear gating producing the pulsing effect on the strings. The technique developed out of an effect DJs used to use called 'transforming' where they would either mute and unmute a channel or quickly fade between an active channel and an empty channel on a mixer in a rhythmic fashion (listen to Public Enemy's "She Watch Channel Zero" to hear this technique used on a horn sample). Studio boffins realized there was an easier way to do this, however, by using a noise gate equipped with a sidechain. But enough of all this, let's get to it, shall we?
1. Fire up your DAW of choice. You can do this with anything that has a noise gate effect built in that has a side-chain input. For this exercise I will be using Logic.
2. You will need two channels of audio for this effect. One should be the audio you want to gate...most usually a pad, string, or other sustaining sort of sound. The other audio will be a hi-hat pattern we will use to determine the actual rhythm of the gating. So go ahead and record a brief riff with your pad sound on one channel.
3. Now record a brief hi-hat pattern. The closed hat will create the shorter, tighter gating, and the open hat will leave the gate open a little longer resulting in a more sustained sound. So make sure your pattern has a bit of both in it.
4. Once you have your hi-hat audio recorded, change the output on Logic's mixer to 'No Output'. We don't actually want to hear the hi-hat itself, we're just going to use it to trigger the gate.
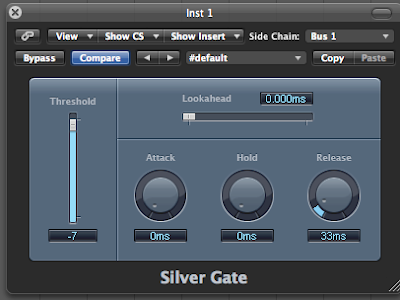
5. Now, on your pad channel, go ahead and select the Silver Gate as an insert effect. You can do this with the full Noise Gate as well, but we don't really need all the extra bells and whistles, so Silver Gate will do just fine.
6. In the upper righthand corner of the effect window, you'll see the drop down menu to select a Side Chain source. This defaults to none. You want to change it to be the channel your hi-hat pattern is on. So if your pad sound is on 'audio 1', and your hi-hat is on 'audio 2', you should set this to audio 2.
7. If you play your track now, you most likely won't hear any difference. That's because we haven't set the 'Threshold', or the volume level at which the gate will be triggered. So go ahead and while your track is playing, gently move the Threshold slider upwards towards zero. You should hear the pad starting to chop rhytmically as you do so. The 'right' level depends on taste, so experiement with different Threshold values for varying amounts of choppiness.
8. If you like, you can leave well enough alone, but I encourage you to play around with the Attack, Hold, and Release parameters as well which can be used to control the 'shape' of the gate. If you find the results are too 'clicky', trying upping your Release level a bit.
What's cool about using this effect over a dedicated gating VST effect is that it's a little less 'perfect', so sometimes you don't get totally clean chops, or the audio chops in a slightly different rhythm than you had intended. Experiment with different settings and you will quickly discover that different settings can give very different sounding rhythms. This is the realm of 'happy accidents' and can sometimes give you results you wouldn't have come up with on your own.
Here's a quick audio example of the effect in action:


No comments:
Post a Comment