 In a time where so much of what a lot of us do is 'in the box', it can be easy to forget that there was a time when noise reduction was a necessity. I'm not even just talking about the inherent noise that was present in tracking to tape, but the instruments themselves sometimes had pretty bad signal to noise ratios by modern standards (The Yamaha DX-7 was notoriously noisey, for example...).
Even if you don't use any hardware instruments or record vocals or guitars, chances are there is still going to be a time where you have a sample or recording that has more noise in it than you would prefer. Fortunately, many audio editors come equipped with tools to deal with this, and if you are careful in your settings, there are very few bad side effects.
Today I'll be showing you how to do this with Apple's Soundtrack Pro.
1. The first thing to keep in mind is that we will need a brief sample of the noise by itself, so don't trim the audio down, just open up the raw file that needs reduction. Especially if you are recording, say, multi-samples of a vintage synth, you should apply any noise reduction to the entire file at once before you edit them into their respective parts because you want the sounds to be consistent from key to key.
2. So load up your sound and isolate a section where there is just the noise by itself. Click and drag on the waveform to highlight some of it. It doesn't have to be super long, but nor should it be excessively short. A second or two should suffice.
3. Go up to the Process menu and select Process->Noise Reduction->Set Noise Print. This is giving Soundtrack a 'fingerprint' of the noise itself, so it knows what parts of the audio to reduce.
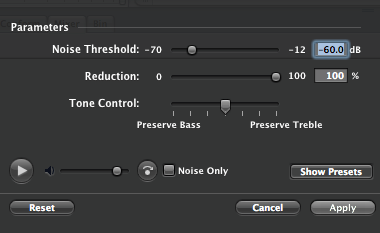
4. Next, select your entire audio file so that the noise reduction will effect all of your audio. Go to the Process menu and select Process->Noise Reduction->Reduce Noise... a new dialog window will open with a range of settings for you to adjust.
5. Even the best noise reduction systems can effect audio adversely if settings aren't careful, so it's important to be able to hear what we're doing as we make adjustments. You'll notice at the bottom left hand corner of the dialog window is a volume slider and play key. This will continuously loop whatever audio you have selected (make sure to select a section that has the synth/voice/guitar/etc in it for this), so you can hear any ill effects and avoid them.
6. The slider you see at the top is probably the most important one - the Threshold slider. This basically lets you tell Soundtrack where the noise floor is in your track. You're defining the level at which you want Soundtrack to start doing its thing. The wrong setting here can adversely effect the audio you actually want to keep, so take your time and listen to the preview loop as you tweak it. If your settings are too extreme here the 'good' audio portion of your track will start to sound grainy, dull, and distorted in an undesirable way. (At least for now... it will probably be the next big trend in dance music in a week or so...)
7. Below this is the Reduction setting. In most cases, 100% is probably fine, but if you find you have a pretty decent Threshold setting that's altering the good audio a little too much, you can back off on the amount of Reduction here and correct that.
8. Below that is another 'tweaking' parameter: Tone Control. This allows you to tell Soundtrack which frequencies are more important to you to preserve: the low ones, the mids, or the highs? Soundtrack will then bias the frequencies it's removing from your signal to have the least detrimental effect to the frequency range you define.
9. There's one more feature here that will help you fine-tune your settings: the Noise Only check box near the preview player. Selecting this will switch the preview audio from being what the file will sound like after noise reduction to being JUST the part of the signal you are removing. If you hear too much of the 'good' signal here, your settings might be too extreme.
10. Once you have settings you are happy with, hit the 'Apply' button and Soundtrack will apply the noise reduction to the file.
It's not always possible to get a totally pristine result depending on the nature of your recordings, but you should be able to hear a pretty significant difference. Consider, too, that perhaps noise isn't always a terrible thing. It can add to the character and warmth of a recording sometimes. But if you do have that one bit of noise in an isolated part of your song that is driving you nuts, now you know how to get rid of it!


1 comment:
Thanks for this article, really worthwhile material.
Post a Comment