Friday, February 27, 2009
Rolling Your Own Bass Sounds Part 3: Dubstep Bass
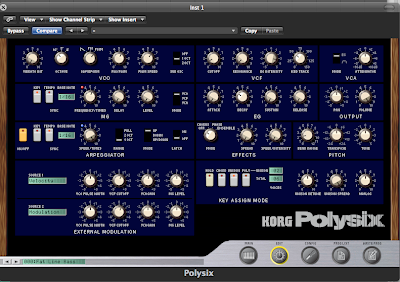
(Click image to enlarge and see settings)
Although it has its origins in the early 2000's, it wasn't until the last 2-3 years that dubstep emerged out of the deepest recesses of the underground. Although still semi-obscure, the popularity of dubstep has increased enough that there are several dubstep-oriented sample libraries on the market now. But of course, it's much more fun to make your own sounds, so today I'm going to show you how to program a dubstep bass using Korg's excellent PolySix emulation.
1. Load up an instance of Polysix in your sequencer of choice. It defaults to the Fat Line Bass setting, which is as good as any place to start. For whatever reason, square (pulse) waves seem to be the most common waveform used in making dubstep basses, so go ahead and chance the WAVEFORM to PW or PWM. It doesn't matter which, as we won't be modulating the pulse width, we'll just be leaving it as a square. While you're in the VCO section, go ahead and drop the OCTAVE setting to 16', as this is the lowest.
2. The original sound is sort of short and plucked, but we want a sustaining sound, so head over to the EG section and throw the SUSTAIN level all the way up to 10. Your ATTACK and RELEASE should be set at 0, and because of the SUSTAIN setting, the DECAY setting isn't important.
3. Next, go up to the VCF section, and turn the filter's CUTOFF all the way down to 0. It's pretty dark and muffled now, but don't worry, we'll be modulating it to change that.
4. So head over to the MG section (Modulation Generator... Korg's name for an LFO). Change the MOD switch to VCF so we're telling the MG to modulate the filter. Make sure the KEY and TEMPO buttons are both selected. Dubstep is a style that relies heavily on syncopation and triplet feels, so we're going to set the BASE NOTE to 1/8T (triplet eigth notes). Note that changing the LFO rate throughout the course of a bassline is quite popular in dubstep, and you can do that by changing the BASE NOTE setting using your sequencer's automation.
5. Finally, we want this sound to be big and fat, so make sure your KEY ASSIGN MODE is set to UNISON. Crank the UNISON DETUNE up to around 6 or 7 and the UNISON SPREAD all the way to 10.
If you've done everything correctly, you should have something that sounds like this (note that I am automating the BASE NOTE setting here as mentioned above):
Can You Hear This Tone?
As you probably know, as we age, our hearing deteriorates. It's often in the high frequencies that the loss is most noticeable. Apparently there was even a device developed in 2005 called the Mosquito that businesses could use to deter teenagers from loitering outside their businesses. This website has a recording of a frequency that supposedly people over the age of 25 can't hear. I'm a bit skeptical because I am well over that age and I have to assume that all the years of touring have damaged my hearing to some degree, but I had no problem hearing it. What about you?
Labels:
The Science of Music
Read Waveformless RSS Feed Through LiveJournal
An enterprising reader has set things up so you can receive the Waveformless RSS feed through LiveJournal should you prefer that to a newsreader. Here's the link: http://syndicated.livejournal.com/waveformless/
Thanks!
Thanks!
Labels:
Blog News
Thursday, February 26, 2009
Goldbaby Introduces Vinyl Drum Machines
New Zealand samplists Goldbaby have made quite a name for themselves recently with their brilliant sample sets of vintage drum machines recorded to various analog tape machines. They have now taken things to the next logical level and introduced a set of 14 vintage drum machine sounds cut to Vinyl Acetate for that classic vinyl sound. I can't wait to see what these guys do next!
Labels:
Drum Machines,
Sample Libraries
A Free Drum Loop Every Day
This has been making the rounds on the various music blogs, so I am a bit behind the times, but in case you missed it, a very generous drummer named Ryan Gruss has started a blog where he has promised to post a live drum loop he played himself every day for free. He's apparently injured at the moment, so he's slowed down momentarily, but this is the sort of thing I love the internet for.
Labels:
Drums,
Free Samples
Absurdly Overpriced Yamaha DX-100 on Ebay
I always find it amusing how gear prices fluctuate based on what becomes popular at the time. Ever since it became widely known that Roger Troutman of Zapp (even if you've never heard Zapp before, you may know Troutman from Dr. Dre & Tupac's "California Love") used a DX-100 as the carrier for his famous talkbox sound, the price of these has gone up to where people are asking 2-4 times what this thing is really worth. Never mind the fact that you can get a TX81z (nearly the same thing) for next to nothing. What's even more hilarious is that the listing indicates 'price reduced'! Just goes to show you... do your research before buying used stuff online.
More info at the listing...
Wednesday, February 25, 2009
Review: MI-7 Sample Library Roundup
In addition to being part of an online musician's community, MI-7 are one of a (relatively) new breed of sample library purveyors who offer most of their wares as downloads. These types of sites are great for a number of reasons. First, because they have no overhead cost in pressing CDs or CD-ROMs, they are generally cheaper. Even better, though, you can have the samples in your hands right away, which is perfect for working musicians on a tight schedule. Today I'll be looking at 3 libraries distributed by MI-7.
Library: PrimeSounds Distoteque
Format: Downloadable WAV and REX2 loops. (Also available as an Audio sampling CD).
Genre: Dark Techno/Dance
Distributed by: MI-7
Price: Individual 'sets' of loops priced anywhere from 1 Euro to 11.60 Euro.
Demo: All loops are previewable on the website
First up, we have Distoteque from PrimeSounds. This library is divided up into 17 smaller downloadable sets arranged by the type of loops contained. The cost of each of these is determined by how many loops are contained in the set. Additionally, you can buy loops individually. MI-7 is one of the only sites I've seen that allows you to do this (it's true of their other libraries as well), so kudos for that. It can save you a lot of money so you don't have to pay for loops you're not going to use. All of samples MI-7 distributes are previewable on the site, so you know what you're getting in advance - another really nice feature.
The loops in Distoteque are not full-on drum loops. Instead, they provide interesting electronic (and heavily processed) rhythmic and percussive elements to add more life and interest to your existing drum tracks. This is a very handy kind of drum library indeed and for working musicians, it can be a huge time-saver when you're up against a deadline. The overall sound of Distoteque could loosely be categorized as 'dark techno', but the loops would work well in pretty much any dance-oriented genre that needs a bit of an edge. Used by themselves, I could see them adapting to soundtrack work quite well, too. The original BPM of all the loops is at 130, but so long as you're using the REX2 versions of the files, this isn't much of a concern. All of the loops transpose within a very flexible range of tempos without any noticable artifacts in your REX player of choice.
The library is divided into sections labeled Distance, HiLife, LoLife, Saturation, Tonals, and Transients to give you a vague idea of what types of loops are contained within. The overall sound of the library is very electronic with processing from every manner of filter, ring modulator, bitcrusher and other sonic manipulator you can imagine. Some of them have a darker sound to them (the Distance and LoLife categories), some are more upfront and present (HiLife and Transients), some are a bit harder and more distorted (Saturation), and some have vague musical or synth elements to them (Tonals). All of the loops sound fantastic and very useable right off the bat. The programming is very skillful throughout and makes it very easy to add a 'techy' element to your tracks. There's really not a bad loop in the bunch. 10/10.
Library: Filibuster Beatbytes
Format: Downloadable WAV and REX2 loops.
Genre: Noise/Experimental
Distributed by: MI-7
Price: Individual 'sets' of loops priced anywhere from 3.92 Euro to 6.72 Euro.
Demo: All loops are previewable on the website.
This library describes itself as: "For those requiring a little grit and grime, digitised and distressed, beats and add-ons in 80 bpm." Talk about understatements. Most of the loops in this collections are distorted into oblivion, oftentimes to the point of being little more than white noise with some sort of rhythmic gate/pulse to it. The loops tend to be more shrill than aggressive, which will restrict their usefulness to a relatively small group of musicians. It's a bit more 'power electronics' sounding than 'power/rhythmic noise' as far as genre classification goes. Even for those experimental types, I question the usefulness of this library since most noise and experimental artists I know prefer to create their own sounds from scratch. Some musicians doing industrial rock or metal might find them useful to use in the intro to a track, but even that seems a bit doubtful given how boring some of the loops themselves are. There's nothing especially spectacular here from a programming perspective. The loops are short, simple, and would seem to be really annoying if used for any length of time in a song (but perhaps that's the point). As before, however, you can buy loops individually, so you can just pick out what you like and leave the rest. 3/10
Library: Prime SFX Impacts
Format: Individual sounds as WAVs (Also available as an Audio sampling CD).
Genre: Industrial/Soundtrack/Foley/Post-production/anything that needs bangs
Distributed by: MI-7
Price: Individual 'sets' of sounds priced anywhere from 2.28 Euro to 15.20 Euro.
Demo: All sounds are previewable on the website
Finally, we have Impacts from Prime SFX, a company specializing in sound effects collections for use in video and audio post-production. While many of their offerings would primarily be of interest to people working in television and film, the Impacts collection would probably appeal to a much wider audience given how well it lends itself to being used as percussion.
Unlike the previous sets reviewed here, this one consists not of loops, but of individual samples, or more accurately, several samples. For whatever reason, Prime SFX just uploaded the tracks from the Audio Sampling CD format for download, so each 'sound' is actually an audio file with (generally) 3 different variations of the same sound one after the other. While it is really useful to have these different strikes (perfect for adding realism in any sampler that offers a 'round robin' cycling mode), I think when most people purchase a downloadable library, they expect the sounds to be edited for them and ready to go right off the bat. I'm sure they figured these would mainly be used by video editors who would edit the sound they needed into place, but I still maintain these should've been edited in advance.
With that one little complaint out of the way, the quality of this library is excellent. Just about every type of loud smash, rattle, bang, and clang is on offer here with sources such as doors, fences, oil drums, springs, glass panels, concrete, plastic, paper, wood, etc. Everything here works well as percussion instruments and the recording quality is very good (there is some limiting on some sounds, presumably to add to the impact, but it isn't the point of being obnoxious). If you're looking for some interesting organic sounds to build rhythm tracks with, you will not be disappointed. And as a former video editor myself, I can say these sounds compare very favorably with other sound effects collections I worked with in the past. I'm giving this one a 9/10, but only because the sounds are not edited. Everything else about the library is a full 10.
Labels:
Reviews,
Sample Libraries
Cyberworm Posts Free Juno-106 Samples
From Cyberworm's page:
"Juno 106 big samples collection. Contain basses, pads, chords, sfx, various synth sounds. 80 multi-sampled, 49 one-shot samples.
wav format, 16 bit, 44100, stereo, 46 mb.
Please don't forget to donate! :)"
GO GET THEM!
Labels:
Free Samples,
Vintage Synths
Tuesday, February 24, 2009
AudioMulch 2.0 Announced: Adds Mac Support
Via Createdigitalmusic.
For those unfamiliar with it, AudioMulch is a DIY synth/processing program along the lines of Reaktor or Max/MSP. Those who use it, however, claim it is much easier to use and may therefore appeal to a wider audience than it's more 'techy' competition. The new version will add several new features, but the most significant one is that it will add Mac support for the first time ever. Read more about it on the AudioMulch website.
Labels:
AudioMulch,
DIY,
Mac Software
Rolling Your Own Bass Sounds Part 2: Electro House Bass
This time out I'm going to show you how to make an electro-house style bass/lead. Electro-house tends to use very simple sounds utilizing classic synth waveforms instead of anything especially exotic. For this exercise, I'll be using ReFX's Vanguard because everyone and their mother has it.
1. Fire up an instance of Vanguard. Click the FX button so it isn't lit up. This is a bass sound so you don't want stuff like delays and reverbs to muddy things up. From the preset browser, select the factory sound LD AlphaOmegaMS to use as a starting point. Hit the EDIT button to expose Vanguard's sound editing controls.
2. Change OSC 1's waveform to SQUARE and lower the SEMI setting to 0.
3. Change OSC 2's waveform to SQUARE as well, but this time, raise the SEMI setting to 24.
4. Finally, change OSC 3's waveform to SINE and lower the SEMI level to -12. While this doesn't necessarily contribute timbrally to the sound, it adds some low end weight that is useful for basses (and is often missing in Vanguard bass sounds, IMHO). You can turn up the VOL level of this oscillator as well to further boost the low end. And that's it! Obviously there is no one electro-house bass, but most others are just as simple to program. Here's a short example of what the result should sound like:
Depeche Mode "Wrong" - Official Video
This may be the best video they've ever done. Perfectly complements the lyrics and is pretty disturbing at the same time. And as I predicted, this song has grown on me big time.
Labels:
Electronic Music Pioneers,
Videos
Studio Electronics SE-1 on Ebay
Similar to the Minimoog, the SE-1 is a 3 oscillator analog monosynth, although this one has filters that are switchable between 24db (Moog-style) and 12db (Oberheim style).
More info at the listing...
Labels:
Studio Electronics
Monday, February 23, 2009
Improving Your Lyrics
Songwriting is a multi-faceted art. Finding just the right combination of notes or chords is only one part of the equation. There's song structure to figure out, the arrangement of instruments, and if you're writing music with vocals, there's coming up with a vocal melody, and just as importantly, the lyrics themselves.
It's unfortunate that the importance of lyrics is often overlooked, but given how widespread the sort of 'lowest common denominator' lyrics tend to be in popular music, it's perhaps not surprising. Still, just because Britney Spears doesn't have anything interesting to say, doesn't mean you shouldn't still strive to make your lyrics the best they can be. While low-brow lyrics can often add to the mainstream appeal of a song, the songs that tend to be remembered in the long-term often do so because they have well-crafted lyrics that people can relate to ("Louie, Louie" notwithstanding...)
Lyric writing isn't easy for most of us, but there is a lot you can to make it less troublesome and to improve the end result. Everyone works differently so there are no 'universal rules', but today I thought I'd share some things I've found useful over the years.
1.Read, Read, Read!
One of the best things you can do to improve any kind of writing is to read as much as you can from other writers. This is probably the easiest single thing you can do to improve your lyrics, as you tend to absorb aspects of good writing almost via osmosis as you go along. Any sort of serious reading will help, but for the purposes of lyric-writing reading poetry and well-written lyrics from other musicians can be extremely helpful. Break down and analyze lyrics you find really effective and figure out what it is specifically that makes them that way. Pay attention to the use of imagery, word choice, and rhythm. You're not looking to copy anyone, just to isolate what they're doing that makes their lyrics work so well. Then you can apply some of those broad concepts to your own work. I'll provide two suggestions to get you started:
Stranger Music: Selected Poems and Songs by Leonard Cohen. Widely regarded as one of the best lyricists alive today, Leonard Cohen should be required reading for any lyricist. This book combines the lyrics to most of his songs, along with his poetry.
The Outlaw Bible of American Poetry edited by Alan Kaufman. Anthologies can be a great way of studying a wide variety of writers with minimal investment. This particular one is a good one to start with for people not ordinarily into poetry as it focuses more on modern poets, and especially those associated with the counterculture... so it's a bit more rock n' roll.
2. Tools of the Trade
Two things no lyric-writer should be without are a rhyming dictionary and a thesaurus. Fortunately, a quick search of Google will give you a number of both online that are absolutely free. Both of these can be invaluable in finding the right word when you're stuck. Alternately, you can check out a computer program such as Masterwriter 2, which is a suite of tools for songwriters all contained in a single program. I use the first version of this program, so I can't vouch for the current version, but the first version has definitely been helpful to me personally.
3. Get a Notebook
Personally, I prefer to compose my lyrics in a notebook. Call me old-fashioned, but I find it much more pleasant and convenient than sitting at a computer keyboard. It also allows me to organize things on a page with more flexibility than your typical word processor allows. Regardless of how you do your actual lyrical composition, a notebook is good to have as it allows you to write down ideas whenever they pop into your head (which is often not when you are in the studio). Write down everything, no matter how unsure you are about it. No one needs to see it, and even if an idea doesn't get used in its raw form, it might be the seed for something that you do use.
4. Write About What You Know
While there is nothing wrong with writing about fictional situations or events you didn't experience yourself, the best lyrics tend to be the ones that are filtered through the writer's personal experience. This is because one person's personal experience often speaks to the human experience itself, and somewhere out there, someone is going to really relate to what you're saying. There is a sense of honesty to these types of lyrics that can really elevate the emotional connection people have with your song. Don't be afraid to make yourself vulnerable or to expose parts of your psyche you may find embarrassing. If you're honest, I guarantee you there is someone out there who has been through the same thing or felt the same way.
5. Know What You're Going to Write About Before You Begin
Most mystery authors will tell you that the first part of writing a good mystery, is to know the ending of the story before you begin writing it. Similarly, the first step in creating lyrics is to actually know what you're going to write about. What is the theme of the song? What story are you telling? What ideas are you trying to get across? Having a clear idea of what your lyrics are going to be about will keep you focused and help prevent a lot of hapless creative flailing.
6. Inspiration
So where do you get the ideas in the first place? As I previously mentioned, personal experience is one of the best sources of inspiration - things you have been through, feelings you have about a political issue, places you have been. But I'm also a strong believer in finding inspiration in other forms - a film, the title of a book, a place you've been that leaves an impression on you. All of it is legitimate fodder for song topics, word and phrase choices, or general atmosphere of a song. Just make sure you are putting your own personal spin on whatever it is that provides that initial seed.
7. Free Associate
Once you know what you want to write about, it can be valuable to free associate a bit before you begin the proper writing of lyrics. Write down descriptive words, phrases, images, etc. related to the song theme on one section of the page - sort of a 'phrase bank' you can draw upon as you are writing. As I said before, don't be self-conscious... no one needs to see what you're writing here, but it can be really helpful when you get stuck.
8. Don't Go for the Obvious Choice
Always be thinking of how to say what you want to say in a more colorful or creative way. Use things like imagery, simile, and personifcation to make what you're trying to express have more impact. Don't give into the temptation to just use the first word or phrase that pops into your head. Challenge yourself and find a more interesting, less obvious way to say it. It takes a lot more work, but the end result will be better for it. Likewise, try and think of a twist you can add to a common type of song. One of my band's popular tracks is called 30k ft.. For all intents and purposes, it's a love song, but what makes it a bit outside the norm is that it is sung into a cell phone on a plane that is about to crash. Think of ways you can do something unexpected with a conventional type of song.
9. The Importance of the Chorus
The chorus of a song is arguably the most important part. It's the part people get stuck in their heads, it's the part they sing along to at your live shows, and it serves more or less as a summary of what the song is about. It appears several times throughout the song, so take the extra time to ensure that your chorus ties everything together in a relevant way. Clever phrases or lyrical 'hooks' belong here more than anywhere else in the song generally.
10. Write More Than You Need
I'll admit that lyric-writing is probably the least enjoyable part of songwriting for me personally. But it's important. Although it leads to more work, I find one of the best ways to get a good end result is to write many more lyrics than I need. Then, go through what you have and choose only the absolute best parts to construct the song. If you're an absurdly great writer, it may be hard to pare down what's the best, but if you're like the rest of us, chances are, if you write twice the amount of lyrics you really need, about half of them will be really good.
I hope this gives you some ideas on how to hone your skills as a lyricist. Realize that no one just pops out of the womb a great, or even competent writer. Like any skill, it takes time and effort to develop and what you get out of it really depends on what you put into it. Don't get discouraged. You'll fail more often than you succeed, and you'll probably drive yourself crazy from time to time, but when you finally really nail it, it makes all the time and effort worthwhile. That said, there are exceptions to pretty much everything I've said, so don't restrict yourself creatively. Lyric writing is an intensely personal thing, and ultimately, you have to find your own methods. Feel free to share them here, too! How do you write lyrics?
Labels:
Lyrics,
Songwriting
The Case for Auto-tune Part 2
Friday was Conan O'Brien's last show in NYC, and his choice for his final musical guest was the White Stripes. What followed was some of the most painful harmonizing I've heard in quite some time.
And if your ears still haven't had enough punishment, check out this post of Kanye West on Saturday Night Live.
Labels:
Live Performance
Synton Syntovox SPX-216 Vocoder on Ebay
Couldn't find much info on this aside from the fact that it was apparently Wendy Carlos' favorite vocoder. From the same Dutch company that made the very rare Syrinx.
Check out the listing...
Labels:
Vocoders
Saturday, February 21, 2009
Depeche Mode Premieres "Wrong" Live @ Echo Awards Berlin
Here's the first proper listen to the new single I've come across. It's not blowing me away, but I have a feeling it's going to grow on me. Certainly seems a dark, down tempo track to choose for a single! What's everyone think?
Goldbaby Give Away Tape MR-16
Goldbaby, everyone's favorite drum sampling Kiwi's, have released yet another cool free sample set. This time, it's the rather obscure 1985 Korg MR-16 drum unit recorded to two different tape machines for extra warmth.
GO GET THEM!
Labels:
Free Samples,
Vintage Drum Machines
MFB Synth II on Ebay
"• 3 analogue VCOs (sawtooth, square, triangle waveforms)
• 2 envelope generators (ADSR)
• analogue 24 dB lowpass filter with resonance (VCF)
• 2 LFOs (sawtooth, square, triangle, random waveforms)
• 50 preset- and 49 user memories
• integrated step sequencer"
More info at the listing...
• 2 envelope generators (ADSR)
• analogue 24 dB lowpass filter with resonance (VCF)
• 2 LFOs (sawtooth, square, triangle, random waveforms)
• 50 preset- and 49 user memories
• integrated step sequencer"
More info at the listing...
Labels:
MFB
Friday, February 20, 2009
Dr Who (How To Remake TV Theme)
Via Synthtopia. A behind the scenes look at the how the greatest television theme song ever was created.
Labels:
Soundtracks,
Videos,
Vintage Synths
Get the Hiss Out in Soundtrack Pro
In a time where so much of what a lot of us do is 'in the box', it can be easy to forget that there was a time when noise reduction was a necessity. I'm not even just talking about the inherent noise that was present in tracking to tape, but the instruments themselves sometimes had pretty bad signal to noise ratios by modern standards (The Yamaha DX-7 was notoriously noisey, for example...).
Even if you don't use any hardware instruments or record vocals or guitars, chances are there is still going to be a time where you have a sample or recording that has more noise in it than you would prefer. Fortunately, many audio editors come equipped with tools to deal with this, and if you are careful in your settings, there are very few bad side effects.
Today I'll be showing you how to do this with Apple's Soundtrack Pro.
1. The first thing to keep in mind is that we will need a brief sample of the noise by itself, so don't trim the audio down, just open up the raw file that needs reduction. Especially if you are recording, say, multi-samples of a vintage synth, you should apply any noise reduction to the entire file at once before you edit them into their respective parts because you want the sounds to be consistent from key to key.
2. So load up your sound and isolate a section where there is just the noise by itself. Click and drag on the waveform to highlight some of it. It doesn't have to be super long, but nor should it be excessively short. A second or two should suffice.
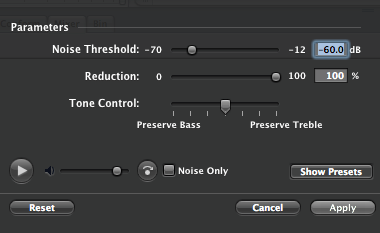
3. Go up to the Process menu and select Process->Noise Reduction->Set Noise Print. This is giving Soundtrack a 'fingerprint' of the noise itself, so it knows what parts of the audio to reduce.
4. Next, select your entire audio file so that the noise reduction will effect all of your audio. Go to the Process menu and select Process->Noise Reduction->Reduce Noise... a new dialog window will open with a range of settings for you to adjust.
5. Even the best noise reduction systems can effect audio adversely if settings aren't careful, so it's important to be able to hear what we're doing as we make adjustments. You'll notice at the bottom left hand corner of the dialog window is a volume slider and play key. This will continuously loop whatever audio you have selected (make sure to select a section that has the synth/voice/guitar/etc in it for this), so you can hear any ill effects and avoid them.
6. The slider you see at the top is probably the most important one - the Threshold slider. This basically lets you tell Soundtrack where the noise floor is in your track. You're defining the level at which you want Soundtrack to start doing its thing. The wrong setting here can adversely effect the audio you actually want to keep, so take your time and listen to the preview loop as you tweak it. If your settings are too extreme here the 'good' audio portion of your track will start to sound grainy, dull, and distorted in an undesirable way. (At least for now... it will probably be the next big trend in dance music in a week or so...)
7. Below this is the Reduction setting. In most cases, 100% is probably fine, but if you find you have a pretty decent Threshold setting that's altering the good audio a little too much, you can back off on the amount of Reduction here and correct that.
8. Below that is another 'tweaking' parameter: Tone Control. This allows you to tell Soundtrack which frequencies are more important to you to preserve: the low ones, the mids, or the highs? Soundtrack will then bias the frequencies it's removing from your signal to have the least detrimental effect to the frequency range you define.
9. There's one more feature here that will help you fine-tune your settings: the Noise Only check box near the preview player. Selecting this will switch the preview audio from being what the file will sound like after noise reduction to being JUST the part of the signal you are removing. If you hear too much of the 'good' signal here, your settings might be too extreme.
10. Once you have settings you are happy with, hit the 'Apply' button and Soundtrack will apply the noise reduction to the file.
It's not always possible to get a totally pristine result depending on the nature of your recordings, but you should be able to hear a pretty significant difference. Consider, too, that perhaps noise isn't always a terrible thing. It can add to the character and warmth of a recording sometimes. But if you do have that one bit of noise in an isolated part of your song that is driving you nuts, now you know how to get rid of it!
Labels:
Soundtrack Pro,
Tutorials
Yamaha CS-40M on Ebay
2 voice, 2 oscillator vintage analog from Yamaha. A favorite of Front 242 towards the beginning of their career.
More info at the listing...
Labels:
Yamaha
Thursday, February 19, 2009
Rolling Your Own Synth Bass Sounds: EBM Bass
It's funny, but different styles of electronic music are almost identifiable by the types of bass sounds they use alone. Would drum n' bass sound like drum n' bass if it wasn't for the nasty, hyper-filtered bass shudders? Would acid sound like acid without a 303 or 202? Would dubstep be dubstep without the LFO wobbles?
Today, I'm going to show you how to quickly and easily make a typical modern EBM bass sound. This genre tends to favor fat and aggressive bass sounds that are very percussive to allow for rapid, 16th-note basslines. So those are the parameters we're going to follow for this tutorial. Obviously there is no 'right' sound you have to use if you're making a particular genre. This is just a starting point to one of many options. As always, you should experiment on your own to customize the sounds to your liking.
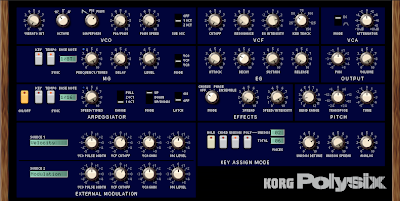
1. Fire up a synth or softsynth that offers Pulse Width Modulation and a unison function. I'll be using Korg's Polysix plug-in because it's a simple synth and the default patch already happens to be a nice synth bass. Go ahead and program a quick bassline in your sequencer. I find it's nice to have something playing automatically as I tweak sounds.
2. The default Fatline Bass sound uses a sawtooth wave, which is great, but we're after as juicy and fat a sound as we can manage, so change the waveform to PWM (may be marked as Square or Pulse on other synths). The sound suddenly sounds a bit hollow. This is because we are playing it back with no pulse width modulation. Go ahead and set both the PW/PWM and the PWM Speed value to about 6. (If you're using another synth, you want to make sure Pulse Width Modulation is on and pushed to about a 60% value, and to set the speed to something moderate... in many cases you will adjust this on an LFO that has been assigned to modulate Pulse Width. It should sound a bit fatter now, almost a little detuned. But we're not done yet.
3. Tweak the Filter Cutoff to a low value, but not quite all the way closed, and up the EG Intensity to around 75%. The EG intensity controls how much the envelope opens and closes the filter's cutoff level, which will give the sound a bright attack and darker body resulting in 'plucked' sort of timbre.
4. If you're using the Polysix, your envelope settings should be pretty good as is. Otherwise, you want your envelope (both filter and amp, if your synth has separate ones) to have zero attack, a low decay (about 1/3 of the way up), zero sustain, and zero release.
5. Now for the final, fattening touch. Put your synth in Unison mode. (If you're using the Polysix, it should already be on...) This plays back several detuned copies of the sound to create super thick, fat textures. On the Polysix, bump the Unison Voices to 2, so each time we hit the key, it will use 2 detuned voices. Next, bump up the Unison Detune level to about halfway. (Higher values can sound wonderfully evil and rave-y, too...) Optionally, you can turn the Unison Spread (this spreads the detuned voices out in the stereo image for a wider sound). Bass generally works best in mono, but if you create your arrangement carefully, using a big stereo bass sound can sound really good. Finally, turn the Analog level up to 5. This parameter simulates the unstable turning of old analog synths and varies the pitch randomly in a pleasing way. You don't have to use this, but I really think it adds a little more character.
(You can click the picture at the top of this post for a larger version if you want to copy the settings...)
Here's what the end result sounds like:
A Whole Mess of Vintage Goodness on Ebay
A whole ton of good stuff at this listing. Roland SH-2 and SH-101, Yamaha CS-15 and CS-30, Roland TR-606 and JX3p, and ton more.
Check out the listing...
Wednesday, February 18, 2009
Review: Sugar Bytes Consequence
Product: Consequence Chord Synquencer
Manufacturer: Sugar Bytes
Type: Plug-in Chord Sequencer with Built-in Sampled Sounds
Support: Via email: http://www.sugar-bytes.com/content/contact/index.php?lang=en or online support forum: http://www.kvraudio.com/forum/viewforum.php?f=108
Platforms: VST for Windows XP or later, VST & AU for OSX 10.4 or later.
Price: $199
Demo: Available at - http://www.sugar-bytes.com/content/download/demo/index.php?lang=en (Demo video available as well at: http://www.sugar-bytes.com/content/download/demo/index.php?lang=en)
Although Sugar Bytes are a relatively new face on the scene in the plug-in world, anyone active in the Reaktor community is probably familiar with the moniker ‘Programchild’ as the creator of some of the more interesting user-built ensembles. Turns out, Programchild is none other than Rico Baade, who along with Robert Fehse are the founders of Sugar Bytes, whose highly-acclaimed Effectrix plug-in you may have read about. Today, I’ll be looking at their latest offering, Consequence, which is billed as a ‘Chord Synquencer’. As the name suggests, this plug-in combines a sequencer with a built-in sample-based synthesizer providing for a unique way to create melodic loops, rhythms, or even live performances.
INSTALLATION
After downloading Consequence and its associated sound library from the Sugar Bytes website, I ran the installer and everything was pretty much as you would expect. Just be sure to have your serial number handy, as you will be asked to enter it right after the installer finishes up. After that, you’re ready to go. I know I don’t mention this much, but seriously, I give a BIG round of applause to any company NOT using dongles for copy protection these days!
DOCUMENTATION
Let’s get this out of the way. Consequence is not necessarily the kind of plug-in you can just fire up and hit the ground running without cracking the manual. Once you have the interface sorted and have messed around a bit, it’s a very easy instrument to figure out. However, it is an unconventional one, and getting the lay of the land will be much easier if you take the time to peek at the manual. The manual explains things fairly well, although a tutorial to get people started would be a nice addition for sure. That said, it will get you oriented with the instrument, and from there, you’ll be able to figure it out on your own pretty easily.
INTERFACE
The interface for Consequence is very good. Sugar Bytes have fit a lot of information and control on a single page (aside from a toggle to reach the EFFECTS section) in a way that makes sense and is easy to use. At the very top, you’ll find a menu bar for choosing between the SYNTH or EFFECTS settings, as well as the preset management system where users can load sound sets by themselves, sequences by themselves, or a ‘global’ preset which contains both. No matter how you save your presets, sequences and sounds can be switched out independently to give you other options to expand your presets further. Like the rhythm of one preset, but the sound set from another? No problem!
Below that are the three instrument slots. Consequence contains three very basic sample-based synthesizers for the sequencer to trigger. Sounds are loaded in from a menu within each slot. There’s not much you can do to edit the sounds – there’s an amplitude envelope and basic filter which can be modulated by a sequencer as well as a bit crush and ‘age’ effect (which is supposed to recreate the tonal inconsistencies you see on vintage synths), but that’s about it for sound sculpting.
If one selects the EFFECTS toggle at the top of the screen, this same area holds the settings for the built-in effects which include a reverser, a chorus, a phaser, a delay, and a reverb. The effects sound quite nice, but for the most part, I found myself preferring to do processing with external plug-ins unless I was automating the built-in ones as part of the sound design. To the right of the instrument slots is a sound recorder that will allow you to make your sequences into WAV files for easy use within Ableton Live, or other loop-based DAWs. This section also contains some global settings for tuning, as well as a 4 on the floor kick drum that you can use for reference when you’re programming sequences (a nice touch).
Below this you’ll find the sequencer section. There are actually many different sequencers within a Consequence preset for controlling different aspects of the groove you’re creating. A modulation sequencer allows step-programmed modulation of the filter, the built-in FX levels, envelope parameters and a handful of other options.
Next up, we find the Performance Sequences which allow you to enter values indicating the octave, glide, tie, triggering mode (for controlling whether a step plays the chord as a chord or as an arpeggiation), and multi-trigger settings (for having a gate fire off more than once in a step, good for rolls, glitches, etc.).
A gate sequencer is next for programming the rhythm and velocity levels of the chords, and below that is the chord sequencer which selects which of the up to 16 defined chords for a particular preset is to sound at a given point in the sequence. So instead of using the bar height in the sequencer determining the pitch, as you might expect, it’s basically choosing from a palette of 16 chord ‘snapshots’ you define in the CHORD MEMORY section at the bottom. These can also be triggered via MIDI which will come in handy for live performance.
In use, the sequencers are a lot of fun. Everything is laid out in from of you in one place making it easy to tweak and twist your sequences as they play. One feature I particularly liked was the shift arrows which will shift the pattern of a sequence back and forth a step at a time allowing you to drastically alter the feel of your loop or just to tweak it to perfection. One thing I think the sequencers are sorely missing, however, is a randomize option. The ability to instantly randomize sequences would be a lot of fun, and would open up possibilities to users they might not have discovered on their own.
I also really wish each sound module could have its own gate and chord sequencers. As it is, all three instruments share the same gate (rhythm) and chord (pitch) sequencers. It becomes possible to create more complex sequences by having some instruments triggered as chords and others as arps, but even just having separate gate sequencers per instrument would really expand what you could do rhythmically with your sequences.
One final wish for the sequencers would be the ability for each sequencer to have its own separate length, so you could run a gate sequence of 8 steps against a modulation sequence of 5 steps, for example, and the relation between the two would constantly be shifting as it played on.
THE SOUNDS
So what about the sounds? After all, this is a ‘Synquencer’, so the sequencer is only half of the equation. I have to say over all, that the built-in samples are probably the weak point of this instrument. Although I am not 100% sure of this, it appears that every instrument is made up of a single sample stretched across the entire range of the instrument. This isn’t necessarily a bad thing on its own, but it does give some of the sounds (particularly the acoustic sounds) a cheap, General-MIDI/ ‘early 90’s computer game music’ feel which seems inappropriate for a modern instrument such as this. This wouldn't be a huge issue if you could load in your own samples, but as of right now, you can not. I’m not a programmer, but it seems like that would be a fairly easy feature to implement in a future version that would expand the possibilities of this instrument significantly.
If you are using the VST version of the plug-in, it is apparently possible to use the MIDI out from Consequence to trigger hardware or software synths, which would also open a lot of possibilities, but alas, I am using Logic and the AU format of the plug-in which doesn’t allow for this due to a restriction of the AU format itself. But for VST users, this increases the appeal of the plug-in greatly.
Not all the sounds are cheesy. There are a lot of really nice mallet and percussion sounds, some passable bass sounds, and other options that sound great, but for the most part, I feel the sound library as it exists now is really selling this instrument short. The preset sequences are also pretty underwhelming for the most part. Digging in and doing your own programming really reveals this to be a much more capable instrument than the presets generally demonstrate. That's the case with most instruments, but I worry that people might just judge this based on the presets without learning what it's truly capable of.
VERDICT
So who is going to find Consequence the most useful? I’d say it would be very useful for minimal, tech, and some electro house, IDM, Berlin-school synth stuff, and creating melodic loops for hip-hop oriented material. People who are used to creating songs out of loops in general will have a lot of fun with this one. I also found it a lot of fun to play with if I was stuck for an idea with a song I was working on. Sometimes programming music in a way that is different than what you’re accustomed to can give you a fresh perspective and some great new ideas.
Overall, I am left with the feeling that this is an instrument that is going to really come into its own with the next version. It’s plenty capable and fun as it exists, but with a better sound library, the ability to load user samples, and separate gate sequencers per instrument slot, Consequence would increase its usefulness by about 10 times.
Here are four quick loops I created myself to give you an idea of what Consequence sounds like. For more extensive audio demos visit the Sugar Bytes website.
Labels:
Reviews,
Sugar Bytes
Sequential Circuits Prophet 2002+ Sampler on Ebay
12-bit sampler with very little memory, but real analog filters and VCA's, which make it highly prized by those who love it.
More info and an animated GIF of a cat wearing headphones at the listing...
Labels:
Sequential Circuits
Tuesday, February 17, 2009
Loopmasters Launches Video Podcast
Sample Library label and distributors Loopmasters have launched a new video podcast called LoopTV.
The monthly podcast will contain artist profiles, product demos & previews, tech tips, and more. And yes, in the interest of stating the obvious, this is a promotional podcast, but it is quite well done, lengthy (30 minutes!), and I think the artist profiles alone are interesting enough even to those not interested in the sample libraries themselves. The first episode is up now and features fellow Seattlite KJ Sawka and his impressive live drum n' bass and jungle drumming.
Labels:
Loopmasters,
Sampling
Arp Avatar on Ebay
A commercial failure, the Avatar was originally designed to be driven by a guitar with hex pickups. Many people drive it with CV, though, to use like a synth expander, especially as the architecture and sound is very similar to the highly-regarded Odyssey.
Video and more info at the listing...
Labels:
Arp
Monday, February 16, 2009
The Trouser Press Record Guide
I grew up in rural New Hampshire. While it's by no means a cultural wasteland, it was a hard place for a lover of underground and electronic music to grow up. I could count on one hand the number of people I went to school with who even knew who Depeche Mode was, let alone actually liked them. Everyone else stuck to a pretty strict diet of classic rock. Needless to say, without some sort of 'mentor', it was tough for me to find new bands I might like, or to know about some important older bands I might have missed.
Thankfully, I had my Trouser Press Record Guide. I bought 3 different editions of it and each one ended up dog-eared and worn the hell out. The Trouser Press was a New York based music magazine from the 80's known mostly for their very opinionated record reviews mostly of alternative rock and new wave bands. I often disagreed with the reviews, but they were so well-written and enjoyable to read, that it didn't bother me at all. The Record Guide was basically an encyclopedia of those reviews, and actually lasted longer than the magazine itself did. At any rate, this thing was my bible throughout high school and college and filled my brain with more useless trivia and musical history than any music book I've owned before or since.
I mention this because all of the reviews from the guide are now online (and actually have been for many years now). Just point your browser over to http://www.trouserpress.com/reviews.php and enjoy! The book does cover a lot of electronic releases, but mostly it will be appealing to anyone who grew up in the 80's or even just has a fondness for the music of that period. And if you really find yourself enjoying it, copies pop up on Ebay fairly regularly.
Labels:
Books
EML Electrocomp 101 on Ebay
About 1,000 of these modular synths were made in the late 70's, so it certainly isn't the rarest thing you're going to come across, but it's not the sort of thing you see popping up on Ebay or in pawn shops too often. 4 oscillators, a multimode filter, and it folds up like a suitcase making it much more portable than the average modular.
More info at the listing...
Labels:
EML
Friday, February 13, 2009
NAMM Oddities 2009
To be honest, my favorite part of NAMM every year is Barry Wood's NAMM Oddities page of weird stuff from the show... Enjoy!
Labels:
Weird Instruments,
WTF
Peter Gabriel Pulls Out of the Oscars
Peter Gabriel, who has been nominated for an Oscar for his song "Down to Earth" from the Disney film "Wall-e", has opted out of performing at the awards show due to them offering him a whopping 65 seconds to perform. Yes, you read that correctly - 65 seconds.
Is this what it's come down to? Are our attention spans whittled down so far that a visionary genius with a 40+ year recording career is only allowed to play basically a single verse and chorus of a song? I realize this isn't the Grammies, but it's not like they're much better.
Anyway, good for Pete. He was a lot more polite about it than I would've been.
Labels:
Electronic Music Pioneers
Open Thread Friday
So since it's Friday, and I know you're all screwing around at work waiting for the clock to wind down (don't deny it), I thought I'd open the floor to suggestions.
What sorts of things would you like to see on this blog? What kinds of tutorials, features, articles, profiles, reviews, etc. would be the most interesting or useful to you?
Labels:
Blog News
Stop Thief!
6 or 7 years ago, my band and another band got together to do a small mini-tour of the Western part of the US. We played our first show in Vancouver and drove back to Seattle that same night. Exhausted, we decided not to unpack the trailer. After all, it was parked in a good neighborhood, and it was almost dawn, so surely it would be safe.
Yeah. Not so much.
We all slept in the next morning, and in broad daylight, some vehicle pulled up next to ours, unhitched the trailer from our van and on to theirs, and drove off with it. Chances are if you're reading this, I don't have to tell you how pissed off we were. I'm a pretty mellow guy, but had we ever found out who took our stuff, I would've had no qualms about 'paying them a visit' if you catch my drift. One thing you just don't mess with is a musician's instruments. But, not everyone follows the same rule book as you and I, so it's a reality that if you aren't careful (and obviously, the best advice is to be fanatically careful with your gear, as we are now), sooner or later, someone might make off with your stuff. So what do you do?
A reader of this blog named Mike sent me a link to a company that has one possible solution from a company called STOP. The way it works is you affix a metal 'security plate' to the bottom of your gear that has a unique bar code on it. This code, along with the make, model, and serial number of your gear is registered with the company, and a phone number is included, so if someone finds your gear for sale, in a pawn shop, at a swap meet, etc., they can call to ensure it is returned to its rightful owner. Even if the thieves succeed in prying the metal plate off, it leaves behind a 'tattoo' on the equipment identifying it as stolen property and again including the phone number.
Not a bad idea, but I think the main problem with this is that it counts on people to do the right thing. I have no doubt that it works a lot of the time, but relying on human nature seems a bit risky to me. Still, I guess it's better to take that chance than to have no means of protection at all. So until they invent LoJack for synths, this might be a good option.
Labels:
Touring
Korg DSS-1 on Ebay
The Korg DSS-1 was sort of an odd beast in that it was both a sampler and a synthesizer. You could 'draw' your own waveforms, or you could load in 12-bit samples to use as the oscillator waveforms. Probably the nicest feature on it, however, are the real analog filters which can actually be switched between 12db/oct and 24db/oct slopes (odd for a sampler). It's a beast, too, weighing in at a hefty 40 pounds.
More info at the listing...
Labels:
Korg,
Vintage Samplers
Thursday, February 12, 2009
Mixerman Has His Own Radio Show...
Last summer, I recommended the very hard-to-find book "The Daily Adventures of Mixerman", which was an anonymous day-by-day account of recording (or trying to) a band that was supposed to be 'the next big thing', but who were a complete mess in virtually every way. My friend Steve just told me that Mixerman now has a podcast. I haven't had the chance to check it out yet, but if it is anywhere near as entertaining as his book, it should make for good listening for recording geeks.
Boutique-y Stuff at Noisebug on Ebay
Noisebug is a store based in Pomona, California that specializes in gear on the more esoteric end of the spectrum. They've got a number of items up on Ebay now, so check them out!
Labels:
Boutique Gear
Wednesday, February 11, 2009
Another Free Online Speech Synthesizer
In response to my last post about YouTube's speech synth, alert reader Simon pointed us to this one which offers much higher quality and renders the output as a WAV file for you, thus eliminating the need to record its output manually. Thanks, Simon!
Labels:
Speech Synthesis
You Tube's Little Known Speech Synthesizer
Anyone who has spent any amount of time on YouTube can attest that the comments section beneath the videos contains some of the most neanderthal rhetoric you're ever likely to find on the internet (and that's saying a lot). Perhaps because of this (I'm too lazy to look it up, get off my back! UPDATE: Reader Brandon reports that the feature was added in response to this online comic: http://xkcd.com/481/), they added an 'Audio Preview' button that will read your post aloud, allowing you to hear how it sounds when someone says it instead of just typing it. The idea being, I guess, that once you hear it read out loud you'll realize what a petty moron you sound like. But the speech synthesis is actually quite good and could certainly serve as sample fodder if you use an audio recording utility such as Audio Hijack Pro to capture its output. It is definitely grainy and muddy, but that's not necessarily a bad thing, and some clever EQing and time in an audio editing program could probably clean it up quite a bit.
Benny Benassi, eat your heart out!
Labels:
Speech Synthesis
Vintage Roland Vocoder on Ebay
A Roland SVC-350 11-band vocoder up for auction:
"The Roland Vocoder uses 10 filters for vowel sounds and there is also an extra filter with an extremely high slew rate allowing it to respond to the rapid transients of hard consonants, like the 'T' in the word-Today. This consonant filter is a feature not found even on higher priced vocoders. The Roland Vocoder allows for both balanced and unbalanced program inputs and outputs and contains a special guitar input that permits attenuation of the guitar harmonics. Another remarkable feature of the Roland Vocoder is a special Hold feature that locks on to the vowel sound quality so that one vowel sound does not have to be continually repeated while you play your instrument. With other features like the Ensemble effect, Headphone Output, as well as guitar amp and line outputs, the Roland Vocoder is truly the next step in musical instrument effects."
More info at the listing...
Tuesday, February 10, 2009
Scientific Attempt to Make the Most Annoying Song Ever
Utilizing a survey taken in the 90's, two guys with nothing better to do decided to try to combine all of the elements into a scientifically-created 'most annoying song ever'. You can hear the track and read more about it in this Wired article, but honestly, as annoying as their song is, it really can't hold a candle to anything done by Brokencyde.
Labels:
The Science of Music
Subscribe to:
Posts (Atom)