Friday, July 30, 2010
Free Sample Friday: Arp Axxe Samples
Another great summer weekend is upon us, and that means it's time for another Free Sample Friday. We have another guest entry today sent to us by reader Psychpoppet. (You can check out his stuff here and here...)
These samples are from an Arp Axxe he's restoring, which just so happens to be one of the black and gold models. 8 sounds in all, including raw waveforms as 24-bit/44.1k WAV files.
Enjoy, and if you dig them, be sure to give Psychepoppet a shout out in the comments!
GO GET THEM!
Labels:
Arp,
Free Sample Friday,
Free Samples
Thursday, July 29, 2010
D16 Changes Name of "SHioiter" to "LuSH 101"
While the world waits for the highly-anticipated release of D16 Group's Roland SH-101 emulator, I came across this item on the D16 User Forums - Apparently the original "Shioiter" name has wisely been replaced by the significantly less shioitty name "LuSH-101". Good move.
Still no word on a release date...
Labels:
D16,
Softsynths
Camel Audio Releases Free Factory Bonus 3 for Alchemy
Camel Audio has released the third free expansion pack for Alchemy. Here's what they have to say:
"Alchemy Factory Presets & Samples Bonus 3 offers over a gigabyte of new samples. Acoustic instruments are a major feature of this latest collection, including a grand piano, baroque lute, cimbalom, autoharp, and hammered dulcimer, plus delicate meditation bowls and crystal glasses. There are also loads of dramatic one-shot hits, sweeps, and crashes, war drums, tabla loops, and bowed cymbal effects.
Electric instruments haven't been forgotten either, with new transistor and tonebar organs, and over 50 new multi-sampled Basses featuring plenty of attitude from low and aggressive to rich and fruity. With soundscapes ranging from sci-fi drones to lush washes, fifteen new classic lead and pad synths, and even a bionic choir, Factory Bonus 3 contains rich pickings for the creative Alchemy user, and includes a bonus selection of 29 showcase presets."
Labels:
Camel Audio,
Free Stuff
The Cars to Reunite?
Saw this over at slicingupeyeballs the other day and meant to post it. Apparently this photo was posted recently on the band's Facebook page. It appears to show the surviving original members (yes, including Ric Ocasek this time) playing together in a studio. So far no word on what it means. Are they working on a new album? Rehearsing for a reunion tour? Both? Either way, it'd be nice to have them back, especially since their final album was really the only one of theirs I didn't like. I know they weren't a strictly electronic band, but few bands mixed synths with infectious guitar pop/rock as well as they did.
Labels:
Bands Reunited
Wednesday, July 28, 2010
Review: D16 Group Plasticlicks Drum Sample Library
Product: Plasticlicks Drum Sample Library
Manufacturer: D16 Group
Format: WAV, Akai S5000/6000, and Sound Fonts (SF2)
Support:http://www.d16.pl/forum
Price: €69
Demo: Sound examples and small selection of free demo sounds available here.
Polish software developers have gained quite a reputation for creating unique effects plug-ins and authentic-sounding emulations of a few classic Roland drum machines. So it was a bit surprising to learn that their new product was a sample library. Does it live up to the quality of their previous products? Read on...
Plasticlicks is a collection of 1,500 electronic drum samples in WAV, SF2, and Akai S5000/6000 formats. Each sound is provided at 4 different velocity levels for more expression. What is the point of sampling electronic sounds at several velocity levels, you may ask? Instead of each sound simply being a progressively louder version of the one that came before it, these appear to be slightly tweaked so that the sounds more closely emulate the way an acoustic drum sound might react when struck harder (slight pitch/brightness/"thwack" variations). I say "appear" because there isn't a lot of info included about how the library was produced. That info might be interesting... what equipment was used, how were the sounds processed and created? Then again, maybe only geeks like me care about stuff like that.
The sounds are all organized logically into folders named Claps, Closed Hihats, Cowbells (in case you have the fever), FX Hihats, Hits (which are mainly bursts of white noise and not melodic/chord hits like you might expect), Kicks, Metal Percussion, Mini Percussion, Open Hihats, Percussion, SFX, Shakers, Snare Drums, Snare Drum Substitutes, Synthetic Percussion, and Tambourines. The SF2 files are obviously self-contained, but the WAV files are all listed with the intended velocity levels listed next to them if you want to map them yourself. And unfortunately, you may want to do that. For some odd reason, instead of organizing these into 'sound menus'/kits where each key has a different sound mapped to it the included mappings consist only of a single sound, sampled at 4 different velocity levels spread across the entire keyboard. I guess the idea here is that you can play with the sounds across a greater range to find the perfect fit for your track, but even most amateurs know how to adjust the pitch of a sample in their sampler of choice, so the logic behind this is a bit difficult to understand.
What's worse is, this is horrible for the workflow in the studio. Trying to find a specific sound turns into a tedious, needlessly long process of loading in instrument after instrument instead of just searching for the sound you want by hitting different keys in a smaller number of mapped instruments. Not only that, but it makes the process of programming a beat less efficient when each sound is its own instrument. This might be alright for grid-style programming, but if you're like me and you like to program your rhythms by playing the parts, it's not very convenient. There is a good reason that most drum sample libraries are mapped into these 'sound menus'. I think it would be fine for them to make the option of single sound mappings to be available in case anyone enjoys this, but I have to be honest, for my way of working in the studio, the current mappings would probably send me looking for sounds in a different library with a more logical mapping set-up. Time is of the essence in the studio, especially for professionals and I think these tiny mappings make the process of finding a sound unnecessarily inefficient.
That said, what about the sounds themselves? They're quite good, actually. The sounds are uncompromisingly analog-sounding, not unlike some of the recent releases from Wave Alchemy. The kicks have lots of punch, the snares are crisp and snappy, and the hats are bright and clear. The multiple velocity levels are more noticeable on some sounds than others, but can add a very subtle, but effect liveliness when they work well. Like many synthetic drum collections, most of these would be more appropriate for lighter styles of music such as minimal (the most obvious match genre-wise if you have to pigeonhole it), synth-pop, Berlin school, etc. Don't get me wrong, the sounds have plenty of punch and presence, but if you're looking for speaker-destroying gabba kicks, this isn't the library for you.
So, overall, we have a mixed bag here. In terms of the sound quality, it's hard to fault this collection. The samples are well recorded and produced and sound great. A little more variety would be nice (to my ears, most of the sounds sounded as if they were created on the same synth), but there's a lot of good material here. Unfortunately, the current mappings make it extremely impractical to audition sounds quickly and efficiently. If these consisted of single velocity samples, mapping them into your own sound menus wouldn't be a big deal, but when you multiply 4 velocity mappings across 63 or so keys, that gets a bit time-consuming. So, in the interest of fairness, I have to split the score here into two scores: Quality & Variety of Sounds: 8/10, Usability/Practicality in the Studio 5/10. If D16 took the time to organize their mappings in a more practical way, the usefulness of this library would be much higher. But only if that won't further delay the release of Sh101ter. ; )
Labels:
D16,
Drums,
Sample Libraries
Tuesday, July 27, 2010
Creating Dirty Stab & Hit Sounds With Tape Delay
When most of us sit down to create new sounds, we mainly think about programming a synth from scratch to match the sound we're imagining in our heads. One thing I've really enjoyed in recent years, however, is concentrating more on using effects to create new sounds. In fact, I wrote a post about this very subject a couple of years ago. Using effects as a manner of sound design is something that doesn't seem as common as it was back in the day when synths were more in need of effects to hold their own and that's a shame, because it really is a fertile source for drastically different sounds.
Today, I'll walk you through a technique that uses a tape delay effect (I'm using Logic's built-in Tape Delay, but any decently featured tape/dub delay should be applicable here) to create a grimey hit/stab sound.
1. Load up an instance of your favorite soft synth or sampler and find a sound that has the same general timbre as the hit you're looking to create. Sampled chords work great, or if you're working with a multi-oscillator synth, tuning the oscillators to an interval like a fourth, a perfect fifth, or a seventh is a good start. On the same channel as your synth/sampler, apply an instance of your favorite tape/dub delay effect.
2. Program a note or chord in your sequencer to trigger the synth/sampler.
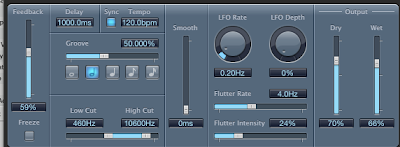
3. Now comes the fun part. What you want to do here is to program the tape delay effect to feed back upon itself. Many tape delays, such as the one built in to Logic have a dedicated FEEDBACK parameter, so this is what you're looking for. With most tape delay effects, this basically controls the number of repeats created by the delay. Once you get past a certain threshold, however (depends on the effect, but it's usually somewhere around 52% or greater), the sound will feed back into itself and each generation of repeat will get progressively more distorted and farther away from the original sound. More extreme values will result in more extreme results. So go ahead and crank your FEEDBACK level to around 60%.
4. We're looking to let each repeat be easily isolated for sampling purposes, so go ahead and set your delay's note value to either a half or whole note, depending on what your delay plug-in of choice offers. Assuming your tape delay syncs to your DAW's master tempo, it can also be helpful to lower your BPM to provide still more space in between repeats to make the sounds still easier to isolate.
5. If your tape delay effect has a "flutter" type parameter to simulate the imperfections of actual audio tape, mess around with these, as they will further bastardize the source sound with each repeat. Mess around with the LOW CUT/HI CUT parameters too, assuming your tape delay of choice has it (it does, or your tape delay of choice sucks). This will make the sound get progressively darker or brighter with each echo and can further manipulate your source sound.
6. Next, go ahead and bounce out your track and make sure to give yourself enough space at the end for the sound to echo through several iterations... preferably 30 seconds to a minute or so.
7. Open up your audio editor of choice, load up the file you just bounced, and search for the echo that sounds the coolest to you. Isolate it, edit it down, and load it into your sampler of choice.
I would urge you not to think of this as your final sound, however. Manipulate the sound further using your sampler's filters, envelopes, LFOs and more and pile on yet more effects from your plug-in folder to take the source sound still further from its original incarnation. Bounce that out, re-import it to your sampler and repeat as necessary until you have something totally new and interesting...
Labels:
Delay,
Logic,
Sound Design,
Tutorials
Sunday, July 25, 2010
Kontents of Komplete 7 Revealed
A sharp reader in this post over on KVR noticed that the musik-service.de website has a listing for Native Instruments Komplete 7, which lists a release date as September.
Sadly, it reveals pretty much what I had suspected of Native Instruments. They're done trying to make innovative and interesting products and are mainly interested in selling presets to people who don't like making their own sounds. Not much new is present in terms of new instruments, instead we get a couple point revisions of existing instruments and all of the Kore sound packs for the preset enthusiasts. Sad, but not surprising I guess. There's probably a lot more money to be made on presets than there is on new and innovative instruments people actually have to learn to use. Here (in German) is the write up from the musik-service site:
"Zusätzlich Neu in KOMPLETE 7:
. The Finger, Reaktor Prism, Scarbee MM Bass,
Scarbee MK1, Scarbee Clavinet, Scarbee A-200,
Berlin Concert Grand, New York Concert Grand,
Upright Piano, Vienna Concert Grand, Abbey Road
60s Drums, Vintage Organs, Reflektor,
Rammfire - Amp Simulation, Traktor's Twelve
und Akoustik Refractions
. KONTAKT4.1, REAKTOR 5.5 ,
. Ãœber 10.000 Presets aller musikalischen Stile
. Fast 100 GB an Sample Material
. 50,- ? Native Instruments Gutschein
. Unendliche Möglichkeiten zur Kreation neuer Klänge
KOMPLETE 7 enthält neben den bisherigen 7 Instrumenten (Reaktor - neue Version 5.5, Kontakt - neue Version 4.1, Guitar Rig 4, Battery 3, Absynth 5, Massive und FM8) zusätzlich 16 der bisher nur online erhältlichen Produkte, was einem Zuwachs der Library um 66% gegenüber Komplete 6 entspricht. Mit fast 100 GB und über 10.000 Sounds ist dies das bisher umfangreichste Komplete! Zum Lieferumfang gehört außerdem noch ein 50,- Euro Gutschein, den man beim Kauf weiterer NI-Online-Produkte einlösen kann.
Die 16 neuen Produkte von Komplete 7 bieten von akustischen und elektrischen Pianos über Vintage Hammonds, E-Gitarren, E-Bässe und 60er Drums bis zu DJ-Effekten und experimentellen Klängen alles, was man als Komponist, Produzent und Musiker braucht."
Labels:
Native Instruments
Friday, July 23, 2010
AU-300: New Plug-in Programmer for Roland Alpha Junos
Saw this over on rekkerd and thought I'd share it here. I'll let the web write-up speak for itself:
"AU-300 is an Audio Unit Plugin based MIDI-Programmer for some famous Japanese synths from the Mid-80's.
It brings the modern DAW based working process together with the analoge sound of the Alpha Juno Family.
- Load it in your AU-Host and control the Alpha Juno just like using a softsynth.
- All settings are saved in the project file (and restored on load).
- All parameters can be modulated and automation curves can be drawn.
- You can save and restore .aupresets files and manage them on your computer
- If your Host is supporting Midi learn, map your controller to it!
This is usually only possible with Sysex-capable controllers."
Labels:
Computers,
Mac Software,
Plug-ins,
Roland
Free Sample Friday: Alchemy Snares
A couple of days ago, I posted an article on using Camel Audio's Alchemy to warp existing drum sounds into brand new, edgy and modern drum sounds. Today's Free Sample Friday selection consists of 15 examples I created from my own drum library using this technique. All sounds are 24-bit stero WAVs.
GO GET THEM!
Labels:
Drums,
Free Sample Friday,
Free Samples
Thursday, July 22, 2010
Free Analog Kick Drum Sample Pack from Rekkerd
Ronnie over at Rekkerd.org has a nice gift for his readers (you do read his blog, right?). 65 samples of the Jomox MBase 01 kick drum synth!
GO GET THEM!
Labels:
Drum Synths,
Free Samples,
Jomox
The Birth of the Prophet VS
This is actually ancient as far stuff on the Internet goes, but I actually ran into this for the first time the other night. Ex-Sequential Circuits employee Chris Meyer, shares his memories about the development of the legendary Prophet VS. Check it out...
Labels:
Sequential Circuits
Wednesday, July 21, 2010
Using Alchemy to Make New Drum Sounds
Although it's certainly not for everyone, there is no doubt that Camel Audio's Alchemy is one of those rare synths that really lives up to the hype that surrounds it. Although it does many things well, the area it is almost unparalleled in is its ability to mangle samples beyond recognition. While many people like to focus these abilities on evolving, organic pad sounds, most people underestimate its abilities to f up their existing drum samples into entirely new, modern sounds. Indeed, given enough time, you could easily create an entire library of new drum sounds for yourself, all sourced from sounds you already have on hand.
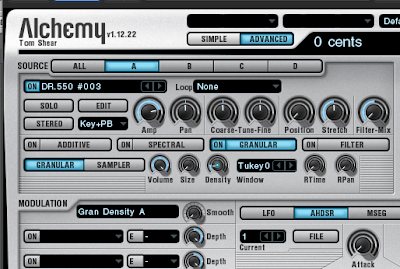
The key to getting started with this technique is to familiarize yourself with importing your own audio into Alchemy. Of course, Alchemy ships with a nicely varied range of source material already, but I've always found it more special to use your own to give yourself more unique sounds. The procedure for doing this is simple. Just click on the name of the waveform under the SOURCE section. This will bring up a menu with a number of options. Select "Import Audio" and a dialog box will open up allowing you to locate and and import the audio of your choice. Try importing a snare drum sample you like.
As you may already know, Alchemy has a number of different ways of analyzing and breaking down the audio that you feed it. Each has its own advantages and drawbacks, but more importantly, each also has its own type of artifacts that come out when abused. That there's your pathway to some unique sounds. Try out the different options (listed at the top of the import dialog): Granular, Additive, Additive + Spec, and Spectral. Once you've chosen a method and imported your sounds, select the SOURCE button at the top of the main page to select whichever source your just loaded your audio into. Try tweaking all the parameters on the source page to see how they change and twist the source material. As I said before, each method introduces its own artifacts when you tweak to extreme degrees, so go crazy.
You will quickly figure out that some methods are better than others for maintaining, say, the punch of a snare, than others. Whereas other methods might be great for smashing your sample up, but might not preserve the oomph you need. This is no problem, because we have access to 4 sources, so we can load different drum sounds (or even the same one) into each slot, each imported via its own method, with its own setting for pitch, pan, start position, stretch, etc etc. This is where you REALLY get into making interesting sounds. View each source as being used for its own component of a single drum sound. Be sure to mess around with pan position for some nice, wide stereo sounds, too.
This is plenty powerful in itself, but you can go even further if you like. Dive into the modulation abilities and try modulating some of those parameters with the step sequencer or multi-segment envelopes. Modulate the filter. Slap some effects on it and modulate the effects. Really interesting and complex effects are possible at this level that can really give your drum and percussion sounds that extra something to make them stand out.
Labels:
Camel Audio,
Drums,
Sound Design,
Tutorials
Subscribe to:
Posts (Atom)