Via Sideline:
Here's a couple of clips of one of the first Nitzer Ebb gigs from back in 1984. "Faded Smiles" and a weird cover of Procol Harum's "Whiter Shade of Pale" never appeared on any of Nitzer Ebb's official releases, which makes the clips all the more special.
Tuesday, September 30, 2008
Monday, September 29, 2008
Plug: Subversive Studios
 If I may be crass and do a plug for a friend of mine for a moment...
Subversive Sound Studio is a Philly based facility that specializes in the production, mixing, remixing, and mastering of electronic music. The head of the studio is Isaac Glendening of the band Cesium-137. I've been to the studio before and it's much nicer than mine. haha At any rate, one of their selling points is that they try to keep their rates as reasonable as possible, so if you're looking for any of these services without having to sell a kidney, give 'em a look!
Labels:
Crass Plugs,
Mastering,
Mixing,
Studio
Saturday, September 27, 2008
Ton of Free Dub Samples
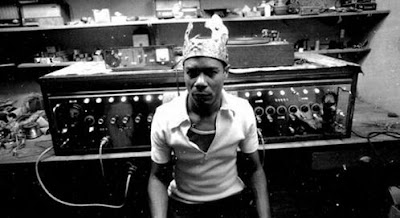
via AudioLemon:
Ton of dub oriented samples... beware that a lot of these appear to be lifted from records, so the copyright legality is iffy...
GO GET THEM!
Labels:
Free Samples
Friday, September 26, 2008
Interview: Ralf Hutter of Kraftwerk - 27 Sep 2008 - NZ Herald: Entertainment News, Reviews and Gossip from New Zealand and around the World
In my recent post about the Kraftwerk documentary I lamented the lack of input from Ralf & Florian. Lo & Behold, today there was an interview with Ralf in the New Zealand Herald. Thanks to Matrixsynth for the link.
Posted using ShareThis
Labels:
Electronic Music Pioneers,
Interviews
Lowcoders & bitplant Release Free Dub Delay Plug-in For Mac!
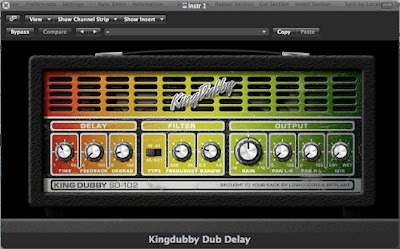 Happy weekend! Poking around on Synthtopia, I see that Lowcoders have teamed up with bitplant to release The King Dubby Tape Delay (if you don't get the pun in the name, you don't listen to enough dub... go buy some!) is a free Universal Binary Audio Unit plug-in for Mac users. I don't know about you, but tape delay is one of my all time favorite effects and I've always got room for another! And dry your tears, Windows users... they are apparently working on a VST Windows version. Please note that this is a beta version, so you may encounter some glitches, but I've not heard of any problems so far...
GO GET IT.
Labels:
Delay,
Free Plug-Ins,
Mac Software
Free Compressor Plug-in from Audio Damage
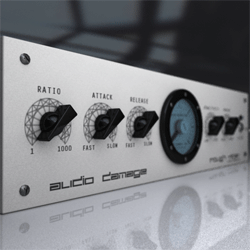 Critically-acclaimed plug-in creators Audio Damage have an early Christmas present for you! Rough Rider is a new, absolutely free compressor plug-in . This would be cool enough on its own, but fortunately, it also happens to sound great! What I like best about it (aside from the nice looking GUI...) is that there are no numbers on any of the dials, so you are forced to use your ears to find the ideal settings instead of plugging in the 'right' settings from some post on the internet or something. Oh, and for those familiar with 90's industrial music, Chris Randall from Sister Machine Gun happens to be one half of the company.
 Here's the details from Audio Damage themselves:
Rough Rider is a modern compressor with a bit of "vintage" style bite and a uniquely warm sound. Perfect for adding compression effects to your drum buss, it also sounds great with synth bass, clean guitar, and backing vocals. Definitely not an all-purpose compressor, Rough Rider is at its best when used to add pump to rhythmic tracks. Of course, you can use it however you'd like. The Compressor Police aren't gonna come to your house and give you a citation. Slap it on a track and crank some knobs.
The front panel layout is done the same as many hardware compressors, so it will be immediately obvious how to use it. A brief overview of the controls:
Ratio: The ratio knob is logarithmic in operation. Completely anti-clockwise is 1:1, and completely clockwise is 1:1000. The 12 o'clock position is 1:10, so everything to the left of center is single digits, and everything to the right is "atom bomb squish," essentially.
Attack and Release: We left off the actual time values, so you're gonna have to use your ears, like the he-men did it in times of myth.
Meter: That honking big dial in the middle of the UI is the gain reduction meter. It basically shows how much compression is occurring.
Sensitivity: usually called "threshold" now, but we think "sensitivity" always made more sense. Turn to the right, you get more compression, essentially. Turn it all the way to the right, and you've got a distortion box, the sound of which is tuned by Ratio, Attack, and Release.
Makeup: 30 dB of gain to compensate for the attenuation caused by the compressor.
Active: From the front panel, this is simply an off/on switch, but if you automate it, strange things happen...
MIDI Learn: Like all of our products, the VST version has MIDI Learn. Download any manual from the current product line for an explanation of how this works, as it is common among all our VST products.
Rough Rider is available as a VST effect for Windows, and an AU or VST for OSX. The OSX versions are Universal Binaries, and require OSX
10.4.0 or later.
Directions:
OSX: Unzip the folder, and place RoughRider.VST in library/audio/plugins/VST and place RoughRider.component in library/audio/plugins/Components.
Windows: Unzip and place RoughRider.dll in your VST plugins folder.
GO GET IT!
Labels:
Audio Damage,
Compression,
Free Plug-Ins
Thursday, September 25, 2008
Some Thoughts on the New Kraftwerk Documentary

When it was first announced, I was very excited to hear about the new Kraftwerk documentary "Kraftwerk and the Electronic Revolution". And judging by the long wait there was for it on Netflix, I was not alone. Now that I've watched it, though, I have to admit to being a bit disappointed. Not because it's a terrible film, but because it actually offers very little insight into Kraftwerk. Where the film succeeds is in its very thorough history of the Krautrock movement that preceded Kraftwerk. Indeed, nearly half of the film is talking about other bands such as Amon Duul, Can, Popol Vuh, Cluster, etc. This is all important in understanding how Krafwerk happened, but it actually almost eclipses the Kraftwerk content at times.
Also disappointing (although not surprising) is the lack of any interviews with Ralf or Florian. Karl Bartos is interviewed extensively, but I think most Kraftwerk enthusiasts have heard his perspective numerous times by now (since he seems to be the only member of the 'classic line-up' who will talk to press). The other interviews and commentary are from a variety of critics, musicians, and academics and actually get a bit long-winded and boring after awhile.
The ending is a bit odd, as well, skipping entirely over Electric Cafe and only briefly mentioning Tour de France Soundtracks and barely mentioning the band's reunion tour and concluding "Well, even geniuses run out of steam". It seems a very odd, down note to end on. That said, this is the first extensive documentary on Kraftwerk that I am aware of and it must've been quite a feat to get the info they DID get on such a reclusive group. Still, the whole thing feels like a missed opportunity to me.
Wednesday, September 24, 2008
DVD Recommendation - Made in Sheffield
Saw this one last night. Excellent documentary on the music scene in Sheffield, England in the late 70's and early 80's which spawned bands like ABC, Clock DVA, the Human League, Cabaret Voltaire, and... uh... Def Leppard (who apparently played a show with the Human League when they were first starting out... still trying to make sense of THAT line-up). Most of the story is told through interviews with members of the bands and archival live footage. If you're a fan of this era of music, this should be required viewing.
Tuesday, September 23, 2008
Free Mac Tape Saturation Plug-in
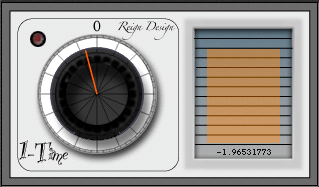
1-Time (one-time) is a FREE mono tape saturation plug-in. It can smooth out harsh transients, add weight to kicks, and more. There is only one setting and only one knob that adjusts the gain. It is a handy and useful tool and it’s free! Download it today!
Labels:
Free Stuff,
Mac Software,
Plug-ins
Monday, September 22, 2008
Another Thought on slotMusic
I think this slotMusic idea is dumb to begin with, but what do you want to bet that Sansdisk rolls out the new format with an ad that uses M's "Pop Music" with new lyrics? Slot...slot...slot music! Yeah. Let THAT haunt your dreams.
Major Labels Announce New 'slotMusic' Format
Future Music is reporting that EMI, Warner Music Group, Universal Music Group, and Sony have teamed up with SansDisk to introduce the new "slotMusic" album format (whoever came up with that name should be kicked in the groin and fired). The format will make available albums for purchase in a compact memory card format like the one used in your digital camera.
I'm not entirely sure what the point of this is, especially since it costs the consumer the exact same amount as an album in CD format and the files on the slotMusic card are in MP3 format. Why on earth would someone pay $5 more for MP3's just because it comes on a tiny, easy to lose memory card? I think these companies are in for the same sort of thing that happened when they tried to release albums on Minidisc format - ie no one bought them and the format died a quick death as a consumer format.
Am I wrong on this? Does the idea of this format appeal to people?
Sunday, September 21, 2008
Free Jomox Airbase 99 Bassdrums Samples
Cyberworm does it again, offering up 100 analog bassdrum sounds created on the Jomox Airbass99.
GO GET THEM!
GO GET THEM!
Labels:
Drum Machines,
Free Samples
Friday, September 19, 2008
Shatner Goes Electro
Via shatnerrulz on You Tube:
This is from awhile back, so I am probably the last to have seen it, but it's quite clever and well done. Reminds me of stuff like Coldcut's "Timber" or Emergency Broadcast Network's "We Will Rock You". Just goes to show there are good sounds all around you if you've got a mic and a sampler...
This is from awhile back, so I am probably the last to have seen it, but it's quite clever and well done. Reminds me of stuff like Coldcut's "Timber" or Emergency Broadcast Network's "We Will Rock You". Just goes to show there are good sounds all around you if you've got a mic and a sampler...
Rare Interview With Yello
Via Bazhuddy on YouTube:
The interview doesn't start until about 4 minutes into the first clip, but if you're a fan (this band was so much more than 'Oh Yeah') it's a rare chance to hear the band talk about their early history, studio techniques, artistic philosophies, etc. In four parts...
The interview doesn't start until about 4 minutes into the first clip, but if you're a fan (this band was so much more than 'Oh Yeah') it's a rare chance to hear the band talk about their early history, studio techniques, artistic philosophies, etc. In four parts...
Labels:
Electronic Music Pioneers,
Interviews,
Videos
Thursday, September 18, 2008
D16 Group to Release Decimort Bitcrusher
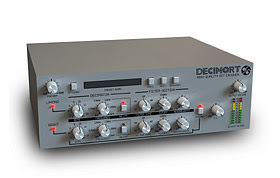
The gang who brought you Nepheton and Drumazon are working on a new bitcrusher plug-in. Here's what they have to say about it:
"Electronic music producers (especially in Hip-Hop) have always been aware that classic samplers (such as early Akai and EMU units) had a character and sound of their own. They added a "grit" and "colour" to the samples and loops they played back which made them sound "Fat" and sit well in a mix.
This sound colouration was due to the encoding techniques, lower sample rates, lower bit rate and conversion circuits which these early samplers used.
Decimort recreates this colouration and adds the vintage sampler magic to any loop, bass line or sound played through it. It also acts as the perfect bit crusher with filter.
Low quality sometimes is desired
The Decimort effect unit is from the SilverLine family of plugins. It is a premium grade bit crusher. The complex and advanced signal processing algorithms within Decimort simulate the behaviour of the whole sampling path which exists in every AD/DA converter.
Decimort has no internal aliasing. The only aliasing effect present in the system is the modelled aliasing of the classic samplers we modelled when creating it. Undesired artefacts are not present in the processed signal. Only wanted artefacts remain. A further very steep low-pass filter, synchronised to the signal frequency, can be applied at the end of the signal path to absolutely ensure that no unwanted out-of-band signals remain.
Two in one
Decimort is also equipped with analogue like filters with adjustable resonance that allow further sculpting of the signal. These can be used to smooth the sound or remove more of the sonic artefacts introduced into the signal path by the modelling process.
Totally independent
Decimort can process the right and left channels of a stereo signal completely independently. This allows all path parameters to be set differently for each channel. This can be used, for example, to create the impression of a wider stereo stage.
Alternatively, both channels can be linked to set path parameters to the same value for both right and left channels.
Requirements
Decimort is available in VST and AU format for both platforms (PC and Mac). It's a dynamic library (.dll file) for PC (VST only) and Universal Binary bundle for Mac (VST and AU).
To use the product you need Windows 2000/XP or Mac OS X 10.4.3 or later. It's not a standalone program so you need a VST or AU compatible host application to use it."
GO TO D16's PAGE
Labels:
Plug-ins
Wednesday, September 17, 2008
Abusive Recycling
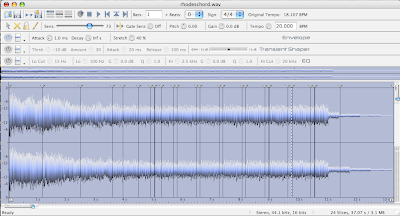 Sometimes the most interesting sounds in electronic music come from using software in ways its creators never intended. It's easy to get boxed in to what a piece of software is 'supposed' to do, that it might never occur to you to try utilizing it new ways.
Propellerhead's venerable Recycle has been the dominant drum loop-slicing utility pretty much since it first came out way back in 1994. I always thought they sold it short by calling it loop slicer, though. Sure, the transient detection makes it ideal for using with drum loops, but if you are experimentally minded, just about any sound source (provided it is not too long) can be sliced to bits and reassembled as well. Sounds that work best are ones that evolve a bit over their length. Load the sound into Recycle, turn up the sensitivity, and Recycle will insert slices in odd places as it tries desperately to find transients. Export the sliced samples and bring it into any sampler that supports REX files, and try playing a random pattern using the sounds. The abrupt cuts and timbral changes can be really striking if arranged correctly, and taken to ridiculous extremes can get you into the territory of the Clicks n' Cuts subgenre of IDM. Try processing each slice individually and doing other crazy stuff to take the sounds even further into mutant territory. Try it on vocals too! It can be fun rearranging the lyrics of a song to say something entirely different than the original.
Labels:
Production Techniques,
Recycle
Tuesday, September 16, 2008
Back That Thang Up
If you work on a lot of music, you probably know the importance of backing your work up. Hard drives are notoriously unreliable as long term storage solutions, and there is nothing worse than the realization that you just lost a year's worth of work in the blink of an eye. Still, most musicians are pretty bad about this until it actually happens to them. (And it will sooner or later...)
Even if you're bad about backing up works in progress, chances are you've filled up your audio hard drive a time or two before and needed to purge material to make more room. Personally, I'm a believer in keeping everything, so any time I need to do this, it means I've got a date with a stack of DVD-Rs and Toast. (Believe me, I've had worse dates!)
I think it is very important, however, to think ahead when you are backing your projects up. You may need to restore a project for one reason or the other 5 years down the road. If that happens, you're going to be really happy if you document the contents of your disc thoroughly. This is also useful if you need to send a project to another musician, producer, etc. How you do this depends entirely on your own workflow, but here's what I do.
Name of Act
Name of Album (if any)
Name of Song in Quotations
Name of Producer/Engineer
Is the song a demo, pre-master, or master?
Backup Medium (CD-R, DVD-R, DVD-RW, Tape Drive, etc.)
Date of Back-up
What DAW format and version number is the project in?
If there are other proprietary file formats, what software and version number was used?
If the project is for a client, it's not a bad idea to include their contact info. Make sure to write this info on the storage medium itself too, as CD-R's and DVD's frequently get separated from their cases one way or the other.
One final thing to keep in mind is that occasionally DAW programs go under drastic changes in their native formats (such as when Logic Audio Platinum went from version 4 to 5), that may make your project unopenable in a future version. One option here is to keep every version of the program on your hard drive. I think the better solution, however, is to restore your old projects and convert them to the new format and then re-save them on a fresh DVD/Tape, etc. If you are really serious about keeping all of your old projects, it's not a bad idea to do this just to save it to new media every 5-10 years anyway. That's probably a bit anal if you store your backups well (in a cool, dark place), but no one ever regretted backing things up too much. The same can't be said for those who don't do it enough.
Labels:
Getting Organized,
Productivity
Monday, September 15, 2008
The Gate To Groove

As much as we all love synthesizers, samplers and other electronic noise makers, I think if we're honest, we have to admit that one area electronics often are lacking, is in expression. Of course, there are numerous ways to add expression, but even with these, it is tough to match the vast variety of sounds that, for example, a skilled guitarist has at his disposal. They can mute notes, play harmonics, slide, bend, pluck, or if you're Jimmy Page (and you're not), even play it with a violin bow. There are some ways to liven up synth lines, however, and today we're going to look at varying a note's gate time to add more of a groove to it.
Gate time simply refers to how long a note is held. If you listen to a really good funk rhythm guitarist, you'll notice that they add rhythmic drive to their parts by interspersing short, muted notes with more sustained ones. This essentially imitates the way a drummer's hi-hat works - when the hi-hat is closed, the sound is short and sharp, and when it is open, the sound sustains more. The drummer adds rhythmic interest by alternating between these two sounds in a musically meaningful way. Since you're a smart bunch, I'll assume you see where I am going here - we can add groove and rhythmic drive simply by varying the gate times of the notes. Here's how to do it:
1. The most important part is that you need a sound with no release to it. In other words, the sound cuts off sharply when you release the keys versus one that fades out more gradually. A Hammond Organ or a Clav sound would be a good example. Most synth basses fit this description as well.
2. This technique works best with 16th notes, so play or step program a bassline with straight 16th notes.
3. Quantize that mutha. (You can skip this if you step programmed).
4. Now open up the riff you just played and quantized in your DAW's 'piano roll' note editor. In Logic 8 , simply double click on the riff in the arrange area.
5. You should be able to alter the lengths of the notes by dragging the end of the little blocks that represent them. To start out, set them all so they are exactly one 16th note in length. No shorter, and no longer. If your bass sound is monophonic, make sure these notes don't overlap. If you step programmed, you can skip this too, as your notes should already be of a uniform length.
6. Now picture a hi-hat pattern in your head. Something that alternates closed and open hats in an interesting way. Start with something simple. Now, every time there is an open hat sounding in your imaginary hi-hat pattern, we'll leave the gate length as it is. But all of the notes that line up with the closed hat in your imaginary pattern we're going to shorten. You can do this by dragging the note ends until they about one 32nd note in length (half the length of the other notes, in other words).
If you done everything correctly, you should have something more dynamic and interesting than what you started with. It takes practice to figure out which notes to lengthen and shorten, but imagining the hi-hat pattern helps. If you want to make it even easier, program the hi-hat pattern into your sequencer to play along with the notes so you have an audio reference point to match it exactly. When you're done, you can simply erase the guide hi-hat track.
Below is a quick and dirty example. The first example features no gate variation at all, the second uses the technique detailed above, and the third also uses that technique, but also adds swing to the quantization to make it groove even harder.
Labels:
Programming,
Sequencing
Sunday, September 14, 2008
Acapella Cover of Daft Punk by the Carleton Singing Knights
Youtube via bassnowbrdr:
Judging by the number of hits this has gotten, I may be the last person on the Internet who hasn't seen this, but it's kinda cool...
Judging by the number of hits this has gotten, I may be the last person on the Internet who hasn't seen this, but it's kinda cool...
Labels:
Live Performance,
Videos,
Vocals
Saturday, September 13, 2008
The Loudness Wars Get Stupid(er)
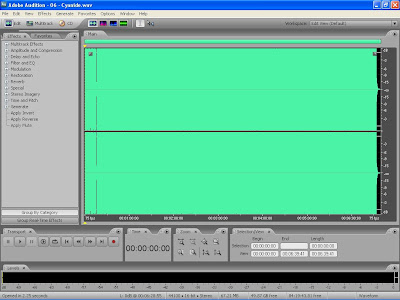 For those unfamiliar with the Loudness Wars, it is a relatively recent phenomenon in mastering where albums are compressed and limited within an inch of their life in an effort to make the album sound louder than other tracks on the radio or in the dance club. To hear it in action, listen to a song you have from the 80's. Now listen to one released recently and the difference should be pretty extreme.
 The problem with this, as you might imagine, is that doing so removes all of the dynamics from the track which not only sounds like crap, but it is physically fatiguing for your ears to listen to. Imagine having a fog horn constantly blasting in your ears for an hour straight and you can see why.
The above picture is one of the new Metallica tracks taken into an audio editor by KVR Forum member 'zircon'. At first, you might think it's empty, with only those few little lines at the bottom left, but you'd have it backwards. The green part is actually the waveform. For shit's sake people, this madness needs to stop. Music was MEANT to have dynamics.
Labels:
Bitchy Editorializing,
Mastering
Camel Audio Announces Alchemy
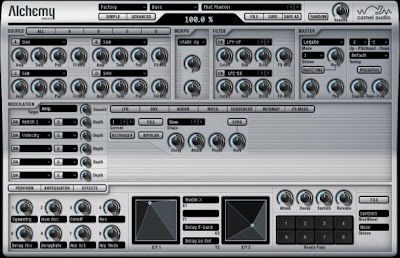 There's been a ton of talk about Spectrasonic's soon-to-be-released Omnisphere, and deservedly so... it looks absolutely amazing. But I haven't seen much talk about Camel Audio's upcoming synth Alchemy, which seems to tread similar ground with a smaller sample library (to me, that's a plus. I don't have room on my hard drive for 55 GB of samples). Here is some of the write-up from the Camel Audio website:
Alchemy is the ultimate sample manipulation synthesizer. It's a synth powerhouse and yet is very easy to use thanks to its performance controls and remix pads. Just tweak the library of excellent presets from many of the world's top sound designers or dive in and analyse your own samples - it's up to you!
Alchemy features additive, spectral and granular synthesis and resynthesis, sampling, and a very capable virtual analog engine with unison and PWM. You can morph or crossfade between sources. You can import your own samples from SFZ, WAV or AIFF files. A wide range of analog modelled filters are included, in addition to a flexible rack of effects which includes all those from CamelPhat and CamelSpace as well as many new effects such as a high quality reverb. The innovative modulation system is extremely flexible, yet easy to use. Alchemy also features a powerful arpeggiator with the ability to import the groove from any MIDI file for immediate synchronization to a beat.
Check out sound demos and a video teaser at the Camel Audio website.
Labels:
Camel Audio,
Plug-ins,
Softsynths
Friday, September 12, 2008
New AU Plug-in Eases Alesis Micron Programming
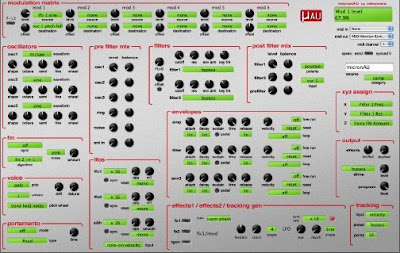
Retroware has introduced a new Mac-only plug-in that allows remote programming of the Alesis Micron. They can describe it better than I can, though, so here you go:
"micronAU is an audio unit that allows one to fully control and automate the Alesis Micron synthesizer. As anyone who owns one of these synths knows, it can generate some wicked sounds but it can be a real pain to program via its single knob. This audio unit provides an interface through which the entire sound generation engine of the Mircon can be controlled in real time. In addition, all parameter settings are saved when the track/DAW hosting micronAU is saved. When one reloads a track hosting mirconAU, the settings are restored, thus avoiding the "what patch did I use for this track" syndrome. Furthermore, if one's DAW supports automation of plugin parameters, all of the Micron's parameters can be automated and controlled by any of the DAW's supported control surfaces. "
Nice! The plug-in is donationware, so if you download it and find it useful, please throw some ducats this guy's way!
GO GET IT!
Thursday, September 11, 2008
Live Drum n' Bass Drummer
Via Briandewaide on YouTube:
You may have seen this before, as it's kind of an old clip, but I never get tired of watching it. KJ Sawka is a Seattle drummer who makes drum n' bass music the old fashioned way. I have his album, "Cyclonic Steel" which is decent, but clearly it's live performance where this guy shines.
You may have seen this before, as it's kind of an old clip, but I never get tired of watching it. KJ Sawka is a Seattle drummer who makes drum n' bass music the old fashioned way. I have his album, "Cyclonic Steel" which is decent, but clearly it's live performance where this guy shines.
Labels:
Live Performance
Wednesday, September 10, 2008
Cool Homemade Instrument by Folktek
Via benpumpkin on YouTube:
The sounds it makes are completely unmusical, but from a design standpoint, this thing sure looks the business!
The sounds it makes are completely unmusical, but from a design standpoint, this thing sure looks the business!
Labels:
Videos,
Weird Instruments
Tuesday, September 9, 2008
Using Pitch Envelopes to Add Attack
 If you've got a flexible synth with really fast envelopes, here's a technique you can use to add a bit more percussive 'oomph' to certain sounds, such as synth basses. In this example, I am using Cakewalk's excellent Rapture synth.
1. Open up an instance of Rapture, which should present you with a blank default program.
2. Load a waveform into the Element 1 window. For our example, I used Saw Mini.
3. Down in the modulators section, select the 'Pitch' box to select the pitch modulation section. This consists of an envelope and a step sequencer for modulating the pitch of Element 1. ('Element' is just Cakewalk speak for an oscillator).
4. Change the EG status to 'ON'.
5. Right click in the pitch envelope window to add 2 breakpoints. Drag the first one you add to about 40% and drag the second one all the way to the bottom.
6. Move the last breakpoint REALLY close to the first so the resulting envelope shape looks like a big, pointy tooth.
Provided your synth has fast enough envelopes, this technique will add a percussive 'kiss' to the sound which can be useful in making extremely punchy bass sounds. Experiment with different amounts of modulation (ie the height of the envelope) and speeds (the length of the envelope) for a variety of other sounds as well. Here is a quick demo with a plain sound to begin, and the same sound with a fast pitch envelope at the beginning.
Labels:
Sound Design,
Synth Programming
Friday, September 5, 2008
Sample Start Modulation
 During a brief period of insanity during the mid to late 90's, synth and sampler manufacturers decided that we as musicians didn't need resonant filters anymore. While not every manufacturer did this, a good number did, and sadly, some otherwise great instruments suffered for their lacking. I was just getting serious about music around this time, and for a good many years, my sole instrument was an Ensoniq EPS-16+ (and indeed, this is the only instrument used on the first Assemblage 23 album). The EPS-16+ was a very cool sampler that offered great bang for the buck, but it also lacked resonant filters. (Although an enterprising third-party named WaveBoy did eventually make a resonant filter software add-on which was really nice sounding.)
I was a big fan of analog sounds, especially stuff that modulated and sweeped a lot. But without a resonant filter, I was kind of locked out of that sound. That is, until I found a nifty way to do exactly what I needed. By starting with a sample of a synth sweeping it's filter, I could simulate these modulation effects by assigning velocity or my modwheel to modulate the start of the sample, thus changing where in the filter sweep sample the sound played.
Most every software sampler these days has a bevy of cool filters, but this is still a useful technique, as it can be used to not only simulate filter modulation, but it can replicate the gated 'transforming' effect made popular in the 90's as well as letting you do interesting things with drum sounds. (Not to mention that it sounds a bit different from 'real' filter modulation...) Here's how to do it in Native Instruments Kontakt
1. Find a long, resonant sweep synth sample online, or if you have a hardware synth, record your own.
2. Import the sample into Kontakt and set the root key so that it is in tune.
3. Beneath the instrument header, click the small green box marked 'Modulation' in the lower lefthand corner. This will open the modulation section for the sampler module itself. In this section, the grey drop down menu on the left represents the modulation source (ie what you use to change the sound). The slider in the middle represents the amount of modulation this source will apply when it is activated. Finally, the drop down menu on the far right represents the Modulation Destination, or what you specifically want to modulate.
4. What destinations are available is dependent on which of the sampler types (ie DFD, Sampler, Time Machine, Tone Machine) you are using. In order to do sample start modulation, you have to select the Sampler module (assuming it is defaulted to DFD).
5. In the Modulation section, select 'midi CC' as your source and change the number in the window next to it to '1'. This selects the modulation wheel as your Source.
6. Move the modulation amount slider fully to the right. You may have to adjust this, as the appropriate setting depends on the speed and length of the sweep sample.
7. Finally, select 'Sample Start' as your Modulation Destination from the drop down menu to the right.
Now play a few notes while you are rocking the modwheel back and forth and you should hear the simulated filter mod. Below is an audio example with the first bit being the original sweep sample, and the second being the same sample with sample start modulation applied to it.
Labels:
Kontakt,
Native Instruments,
Sampling,
Sound Design
Wednesday, September 3, 2008
New Kraftwerk Documentary
Haven't watched it yet, but I'm hoping to this weekend. Just thought I would let people know it was out there, since I haven't seen any press on it to speak of.
Tuesday, September 2, 2008
New Ear-Training Plug-ins for Mac
Software newcomers Aricula have introduced a novel concept in the form of 7 Mac-only AU-format plug-ins aimed at helping aspiring mixers train their ears, recognize common audio problems, and hence improve their mixing skills.
The plug-ins alter whatever audio is on the track they are applied to, and users are quizzed on how the audio has been changed, or are asked to replicate randomly generated settings by ear. The various plug-ins cover topics such as EQing, stereo imaging, gain changes, time delays, etc. Best of all, the plug-ins are dirt cheap - just $1.99 a piece, or $8.99 for the entire bunch.
The plug-ins alter whatever audio is on the track they are applied to, and users are quizzed on how the audio has been changed, or are asked to replicate randomly generated settings by ear. The various plug-ins cover topics such as EQing, stereo imaging, gain changes, time delays, etc. Best of all, the plug-ins are dirt cheap - just $1.99 a piece, or $8.99 for the entire bunch.
Labels:
Plug-ins
Silicon Teens - Memphis Tennessee
YouTube via MuteChannel
While many electronic music geeks are probably familiar with Mute Records head Daniel Miller's late 70's project The Normal (in particular, their sole single "Warm Leatherette", which has since been covered dozens of times), fewer are aware of an album he released under the name Silicon Teens. The band's sole album (1980's "Music for Parties") was a collection of classic rock songs given a decidedly cheesy synth-pop treatment. While the band did have 'members' aside from Miller, these were later revealed to be actors, so the true credits behind the project are a bit sketchy.
Subscribe to:
Comments (Atom)

