Friday, July 31, 2009
Open Thread Friday: What Song or Artist Got You Into Electronic Music?
I thought I'd do another one of these since the last one got such a good response. What was the song or artist that got you interested in electronic music in the first place?
I'm still surprised with how vividly I remember mine. I was 8 years old and my family was visiting my aunt and uncle in the midwest. It was a fall day and my cousins and I were playing on their trampoline in the back yard. We had a radio playing some Top 40 type countdown show and this was the week that Gary Numan's "Cars" first charted in the US. When I first heard those Polymoog strings and the white noise clap sounds I froze and asked my cousins what instrument made that sound. They didn't know, and I wouldn't know until a few years later, all I knew is that whatever made those sounds was something I wanted to hear more of.
Cut to almost 30 years later and now I make my living making electronic music. I often wonder how differently my life might have turned out if we hadn't had the radio turned on that day.
Labels:
Open Threads
Ace Tone PS-1000 on Ebay
Ace Tone was a Japanese company started in the late 60's by Ikutaro Kakehashi who would go on to start Roland.
Info at the listing...
Labels:
Rare Instruments
Thursday, July 30, 2009
Useful Noise
When you hear people touting the merits of their favorite synth, you're pretty much guaranteed to hear them speaking of the quality of the oscillators or the filters. Almost never will you hear any mention of the noise generator, and that's a shame. Sure, most noise generators sound pretty similar in their raw state, but a noise generator is an incredibly useful thing for sound design, so I thought I'd talk a little about that today.
• 9 times out of 10, when you're talking about a noise generator on a synth, you're really talking about a white noise generator. White Noise is essentially a signal consisting of totally random frequencies that sounds like a steady hiss. There are, however, other 'colors' of noise (and if anyone out there knows how the color naming for types of noise came about, I'd love to hear it...) differentiated by the spectral density of certain frequency bands. Pink noise, for instance, tends to have bit more emphasis on lower frequencies, so it can be useful for synthesizing 'boomy' sounds like kettle drums or explosions. There is also red noise, blue noise, violet noise, grey noise, orange noise, and special definitions such as green noise (supposedly the 'background noise' of the world), and black noise (aka silence). White noise is all you're likely to find on most synths, though (some synths offer pink noise, too, but this is less common). Because most of these other types of noise are based on frequency biases, you can emulate them by boosting the proper frequencies in white noise with an equalizer.
• White noise is very useful for emulating natural sounds such as ocean waves or wind. Just use an envelope or LFO to modulate the cutoff frequency on a low pass filter. A little resonance on the filter can lend a bit more 'howl' to your wind at lower cutoff values.
• Noise is also an essential component in virtually any drum or percussion sound. It's rarely used in kicks (although if it is controlled with a short envelope, it can add a little impact to kick sounds too), but is great for emulating the rattle of a snare drum, the body of hand claps, and hi-hats.
• Speaking of hi-hats, they are dead easy to emulate with a noise generator. Just use a very short amplitude envelope for closed hats, and one with a longer decay for the open hat. Program your hat sounds to be monophonic too, so that the closed hats cut off the 'ring' of the open hat, just like real hats do. If your synth has a high pass filter, try using that and setting your cutoff value rather high. This will get you a slightly more metallic-sounding hat than a low pass filter will. If you want still more metallic-sounding hats, try using a ring modulator.
• Noise is also really useful for all manner of trance whooshes, reverses, and transition effects. Try sending the noise through a filter and automating the cutoff value to generate the whoosh. Experiment with different resonance values on the filter. Add a phase effect to get a cool retro whoosh effect. Throw some stereo delay or reverb on to 'embiggen' the whoosh and create more atmosphere. Sweeps are always good candidates for compression as well. Adding some light compression will even out the levels and make the sweep more audible throughout its entire range in a mix.
• Did you know you can play a melody with noise? Send some noise through a low pass filter with a low cutoff value and high resonance level, and it begins to take on a cool, tonal quality. Getting it precisely tuned across the keyboard can be a bit more difficult, but if you modulate the cutoff frequency by the keyboard position, there should be a setting that will map the tuned noise to a proper scale. Alternately, you can just sample the tuned noise and map it to your keyboard that way.
• White noise by itself is pretty damn versatile, but sooner or later you may find yourself wanting something more complex and organic. Get out your favorite sampling mic and venture out into the world around you. Noise is everywhere. Try sampling yourself exhaling heavily, or blowing across a length of PVC pipe. Sample some noise off of an old cassette, answering machine (remember those?), or VHS tape. Crumple up or rip some paper. Pour some water. Whip a small stick very rapidly over your mic. Even just sample the ambient noise of the room you're in. Take a nice long section of one of these recordings, loop it, and layer it just slightly behind your standard synth pad/string sound and suddenly your pad becomes a lot more interesting. Be sure to program the amplitude envelope of the noise to match that of the pad for best results.
• Noise can add impact, too. A short burst of noise (controlled with a short amplitude envelope) can sound great at the beginning of a percussive bass sound. Add a little slightly behind an aggressive lead too to add interest.
Do you have any favorite techniques for using noise in your sound design? Let us know!
• 9 times out of 10, when you're talking about a noise generator on a synth, you're really talking about a white noise generator. White Noise is essentially a signal consisting of totally random frequencies that sounds like a steady hiss. There are, however, other 'colors' of noise (and if anyone out there knows how the color naming for types of noise came about, I'd love to hear it...) differentiated by the spectral density of certain frequency bands. Pink noise, for instance, tends to have bit more emphasis on lower frequencies, so it can be useful for synthesizing 'boomy' sounds like kettle drums or explosions. There is also red noise, blue noise, violet noise, grey noise, orange noise, and special definitions such as green noise (supposedly the 'background noise' of the world), and black noise (aka silence). White noise is all you're likely to find on most synths, though (some synths offer pink noise, too, but this is less common). Because most of these other types of noise are based on frequency biases, you can emulate them by boosting the proper frequencies in white noise with an equalizer.
• White noise is very useful for emulating natural sounds such as ocean waves or wind. Just use an envelope or LFO to modulate the cutoff frequency on a low pass filter. A little resonance on the filter can lend a bit more 'howl' to your wind at lower cutoff values.
• Noise is also an essential component in virtually any drum or percussion sound. It's rarely used in kicks (although if it is controlled with a short envelope, it can add a little impact to kick sounds too), but is great for emulating the rattle of a snare drum, the body of hand claps, and hi-hats.
• Speaking of hi-hats, they are dead easy to emulate with a noise generator. Just use a very short amplitude envelope for closed hats, and one with a longer decay for the open hat. Program your hat sounds to be monophonic too, so that the closed hats cut off the 'ring' of the open hat, just like real hats do. If your synth has a high pass filter, try using that and setting your cutoff value rather high. This will get you a slightly more metallic-sounding hat than a low pass filter will. If you want still more metallic-sounding hats, try using a ring modulator.
• Noise is also really useful for all manner of trance whooshes, reverses, and transition effects. Try sending the noise through a filter and automating the cutoff value to generate the whoosh. Experiment with different resonance values on the filter. Add a phase effect to get a cool retro whoosh effect. Throw some stereo delay or reverb on to 'embiggen' the whoosh and create more atmosphere. Sweeps are always good candidates for compression as well. Adding some light compression will even out the levels and make the sweep more audible throughout its entire range in a mix.
• Did you know you can play a melody with noise? Send some noise through a low pass filter with a low cutoff value and high resonance level, and it begins to take on a cool, tonal quality. Getting it precisely tuned across the keyboard can be a bit more difficult, but if you modulate the cutoff frequency by the keyboard position, there should be a setting that will map the tuned noise to a proper scale. Alternately, you can just sample the tuned noise and map it to your keyboard that way.
• White noise by itself is pretty damn versatile, but sooner or later you may find yourself wanting something more complex and organic. Get out your favorite sampling mic and venture out into the world around you. Noise is everywhere. Try sampling yourself exhaling heavily, or blowing across a length of PVC pipe. Sample some noise off of an old cassette, answering machine (remember those?), or VHS tape. Crumple up or rip some paper. Pour some water. Whip a small stick very rapidly over your mic. Even just sample the ambient noise of the room you're in. Take a nice long section of one of these recordings, loop it, and layer it just slightly behind your standard synth pad/string sound and suddenly your pad becomes a lot more interesting. Be sure to program the amplitude envelope of the noise to match that of the pad for best results.
• Noise can add impact, too. A short burst of noise (controlled with a short amplitude envelope) can sound great at the beginning of a percussive bass sound. Add a little slightly behind an aggressive lead too to add interest.
Do you have any favorite techniques for using noise in your sound design? Let us know!
Labels:
Noise,
Sound Design,
Synth Programming
Analogue Systems French Connection on Ebay
Here's a bit of boutique kit based on the infamous 1920's French instrument the Ondes Martenot (most recently used by Radiohead).
Info at the listing...
Labels:
Boutique Gear
Wednesday, July 29, 2009
Resources for the Oberheim Matrix-6/6R/1000
I'm not one to gloat. But seriously, for the past 25+ years, it seems like virtually all my gearhead friends have found some ridiculous deal on a nice piece of gear, while in my usual search for cool, old gear, I never find anything at a good price. But last week, I managed to pick up an Oberheim Matrix-6R for $80. So you'll excuse me if I finally gloat.
Anyway, in the interest of doing something more than gloating like a douchebag, I thought I would take this opportunity to gather some helpful links related to the Oberheim Matrix-6/6R/1000...
• For some reason, a lot of synth manufacturers during the mid-late 80's decided it would be a good idea to include their parameter and programming values printed on top of their rack gear. Of course, once you place it in a rack or put another piece of gear on top of it, you can no longer remember which parameter is which. So here is a print-out of the parameters for an Oberheim Matrix6/6R/1000.
• Here are the original factory presets originally loadable via the cassette interface, saved as a WAV file.
• Download the manual here.
• I haven't tried this yet, but here is a computer-based editor for these synths for OSX users....
Tuesday, July 28, 2009
Will Consumers Drink Up Apple's Cocktail?
Apple is joining forces with the 4 major label groups on a new project codenamed "Cocktail". The idea behind Cocktail is to add features like full album art/booklets and liner notes that have been largely lost in digital music sales. They've been fairly vague about the details, but have hinted that there is more to it than just this. One would assume that if the model worked for the major labels, it could eventually reach out to indie labels and musicians.
I know I personally really miss the experience of listening to an album while I'm looking at the artwork, reading the lyrics and liner notes, but I also know I'm older than the demographic music retailers are generally most concerned with. Most younger music fans I talk to don't seem to care about these things so much. Do you think something like this would make people more likely to buy music? Does it appeal to you at all?
Labels:
Apple,
The Music Business
Monday, July 27, 2009
Eavesdropping on Yourself
You probably know by now that when you are mixing down a song, it's a good idea to listen to your mix on a variety of playback systems - car stereo, iPod, computer speakers, home stereo - before committing to your final mix. Different systems will reproduce sound differently, so listening on a wide variety of systems helps you fine tune your mix so that it sounds good wherever a potential listener might hear it.
Over the years, I've discovered another trick has come in handy particularly when I've been mixing for awhile and am having trouble figuring if a particular mix element is too loud/quiet. I simply start playback on my song, and step into the other room and listen from there. For whatever reason, this always helps me easily hear if a mix element is where it needs to be. Perhaps getting out from in front of the speakers just 'resets' things for me, but regardless of the science behind it, it seems to do the trick. Your mileage may vary, but give it a try some time. Do you have any 'unconventional' methods of evaluating a mix?
Labels:
Mixing
Friday, July 24, 2009
Open Thread Friday: Your First Synth
What was your first synthesizer? Mine was a Korg Poly-800. I was in about 7th grade and had recently discovered synthesizers and became obsessed with getting one of my own. There was a music store (the now sadly defunct "Downtown Music" in White River Junction, Vermont) across the street from the martial arts studio I was taking lessons at and I used to spend hours at before and after my Karate and Judo classes. The guy who ran the store was a friendly guy who called himself "Downtown Dave" (as an adult, I now realize how much that sounds like a pimp name...) who never bitched that his store became my second home despite my inability to buy anything there. I eventually decided I absolutely had to have a Korg DW-6000.
So, I worked all summer mowing lawns and clearing brush and saved my money away. I really worked my ass off, all the time reminding myself what it was for when I'd get tired. Eventually, I saved up almost enough for the synth, and my parents, impressed by my determination, volunteered to pick up the rest of the cost so I could get it. I was over the moon. But, since I just told you my first synth was a Poly-800, you can probably guess I never got the DW-6000. Turns out it was discontinued at precisely the point I had the funds to buy it, and the DW-8000 that replaced it was a bit too much to afford. I was devastated and felt totally defeated. I more or less forgot about ever getting a synth.
Cut forward to that Christmas and under the tree was a second hand, but totally mint Poly-800 with a nice hardshell case, a stand, and a little practice amp. I'm not sure if I even opened my other presents until later that morning. I set the synth up in the other room and played with it for hours on end, undoubtedly driving my family up the wall since I didn't actually know how to play an instrument at that point.
The Poly-800 wasn't a great synth. Truth be told, it's actually a pretty mediocre machine. But I got so much use out of that thing and learned how to use it inside and out. I taught myself to play it, I taught myself to program it, and I eventually recorded 3 90-minute tapes full of (terrible) original music before I even reached high school. I never had any idea back then that it would open the door to what would eventually become my career, but I will never forget the Christmas I got it.
So what was your first synth? What do you remember about it? And how many of you are going to make me feel like an old man by having your first synth be a softsynth?
Labels:
Open Threads
Initial Thoughts on the New Logic
So, yesterday Apple casually released version 9 of Logic. There's not a whole ton of info out just yet, but here are some initial thoughts based on what I've seen.
• It seems unclear whether it will require an Intel processor or not. The tech specs page on the Apple website say an Intel processor is required to 'install all apps'. That could mean that perhaps some of the apps could run on a PPC. I've heard rumors that the installers are Universal Binaries, but until I see something definitive, I think it's best to treat those only as rumors. I'd say if PPC is supported, it won't be for long (aka when Snow Leopard comes), though, so it's probably best for those of us with older computers to start saving for an upgrade. (A shame, as my 5-year old G5 still works great and does everything I need it to.) UPDATE: Logic 9 DOES work on PPC's for now, it just isn't supported by Apple. PPC users will likely be locked out once Snow Leopard arrives, but at least they can get a taste of the Logic 9 action in the meantime.
• The full user manual is not online yet, but you can have a look at:
The Installation Guide
Exploring Logic 9
Exploring Mainstage 2
UPDATE: The full User Manual is up now.
• If you JUST bought Logic 8 and are hoping for a free or discounted upgrade, apparently you are S.O.L. Apple has said those users will have to buy the new version at the full upgrade price. BOO, APPLE!
• So far there has been no mention if the new version fixes any of the annoying bugs that have been driving Logic 8 users batty for the past couple of years. Here's hoping the 'buffer burps' and 'processor overload' bugs are gone and we get back to the stability Logic 7 offered.
• Featureswise, I am a little underwhelmed, to be honest. Granted, Logic is already a great program, but this update seems a bit light on new features compared to what a huge step forward Logic 8 was from 7. The main new features include Ableton-like elastic audio capabilities, easy drum sound replacement, bounce-in-place, New Amp Designer & Pedalboard effects, the ability to turn any region into a sampler instrument, & Track Notes to allow you to keep notes regarding a specific session or project. These are nice additions, to be sure, but only two new effects plug-ins? No new instruments? Again, Logic's built-in instruments have actually held up remarkably well for how old they are, but come on, Apple, surely you can come up with something cool and new. Perhaps I'm spoiled, but I just expected more.
• I see Apple is still pushing Apple Loops. Please, just let it die. The format sucks and REX2 is too widespread already. It's like trying to introduce the Zune when the iPod already dominates the market.
So what do you think so far?
Thursday, July 23, 2009
Apple Releases Logic 9
That's what I get for sleeping late this morning! Apple has announced the new version of Logic Studio (aka Logic 9). Lots of 'flexible audio' type features have been added, as well as new tools for guitarists, and what looks to be a nice upgrade to Mainstage for live performances. But stop wasting your time here, just go check out Apple's page! So are you going to upgrade?
Watch Full-Length Daft Punk Film on Google Video
"Interstella 5555", the full-length feature by Daft Punk, is available for viewing on Google Video. I don't know how legit this is, so it might not be around for long, so check it out while you can. And if you like it, be sure to pick up a copy so you can appreciate the groovy visuals in full resolution!
Labels:
Videos
Wednesday, July 22, 2009
Creating Reverse Reverb Effects
Although you don't hear the effect as much as you used to, reverse reverb can be a very dramatic effect when used properly. (Think Phil Collin's "In the Air Tonight" or Carol-Ann's screams to her mother when she is sucked inside the television in the movie Poltergeist...) In the old days, the process to achieve this effect was rather convoluted, but it's quite easy to achieve nowadays.
I'm going to walk you through the process of a reverse reverb leading up to the first part of a vocal, which is probably the most common use of the effect. It sounds cool on just about any track you would normally use reverb on, though.
1. Using your DAW's editing tools, make a cut to isolate the first word of your vocal track. Copy the edited first word to its own track.
2. Assign a reverb to the new track and set the wet/dry level to 100% so you are hearing nothing but the reverbed signal. What type of reverb you choose depends largely on how long you want the 'leading up' of the effect to last, but starting with a general 'large hall' type effect is a good place to start.
3. Bounce the snippet down, being sure to set the end time late enough that you capture the entire reverb tail.
4. Import the bounced audio and use your DAW's audio editing facilities to reverse the file.
5. Place the reversed audio on its own track and line it up so the effect ends precisely where your main vocal part begins. Expanding the size of your tracks so you can see the audio's waveforms makes this a snap.
And that's it. When you're satisfied with the results, you can get rid of the temporary track you used to bounce that first word out, but if you're not, you can use it again with different reverb settings until you find something you like. Note that this effect can be very cool with delays too, especially tape delays set so the delays degrade with each repeat.
Tuesday, July 21, 2009
You Can't Make This Stuff Up
So yesterday I had to get publicity photos done for the album I'm releasing this fall. This is probably my least favorite part of the whole 'promoting a record' process. Everything about it just feels awkward, unnatural, and weird to me. Fortunately, I have had the privilege over the years of working with some amazingly talented photographers who not only make the process fun, but who actually managed to make me look halfway decent (no mean feat).
So Bob, the guy who does my promo shots drove up from Portland today and we spent about 10 hours taking shots in different areas areas around Seattle. The last of these locations was a scrapyard in the industrial district. It was filled with all sorts of giant hunks of rusted metal and decaying old bits of construction equipment. Best of all, it was easily accessible. No fence. No signs warning against trespassing. No cranky security guards. Perfect.
As we set stuff up, in the distance, some sort of loud argument was taking place between a guy in an old taxi and another party we couldn't see. It sounded pretty heated, but it seemed to dissipate fairly quickly, so we went ahead and got our shots. Some cops showed up and interviewed someone off in the distance and left. We loaded our stuff back into the van. I had packed all my stuff up, so I climbed in the driver's seat to wait for Bob to finish taking down his lights.
Just then, a dirty, disheveled-looking guy came stumbling towards us from the area we had just been shooting. He had a large wooden beam slung over his shoulder like a baseball bat. He approached Bob and blurted out something unintelligible (he was pretty plowed). "Huh?" Bob replied. The drunk guy slurred, "I just split that guy's wig." Bob: "Oh?" The drunk guy sighed, "I just wanted to see what was going on over here." Bob said, "No problem, brother." and the drunk guy turned around and walked back in the direction from which he'd come. Not 5 seconds later, two cop cars come screeching into the parking lot where they detained him. No idea if he'd actually hit anyone with that beam of his (we didn't hear any sort of struggle or screams), but I was glad he hadn't decided to brain us with it.
Only in the music industry could something as simple as a photo shoot turn into a scenario worthy of an episode of COPS.
Labels:
WTF
Monday, July 20, 2009
Homeless G-Funk Beat Boxer
This is amazing... this guy does a pretty dead-on impression of the infamous Heil Talkbox. Roger Troutman would be proud!
Labels:
Live Performance,
Street Performers,
Videos
Rolling Your Own Pad Sounds: Making a Pad from Your Voice in Alchemy
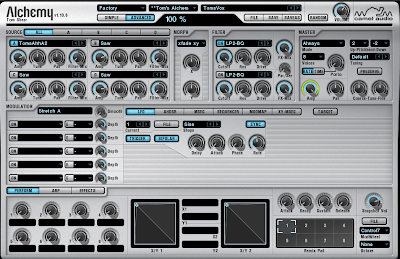
When 10cc released their schmaltzy hit "I'm Not In Love" in 1975, readily accessible sampling technology was still years away from being available to musicians, and yet the song featured an incredibly lush, undoubtedly unnatural vocal pad throughout. Unbelievably, they achieved this feat by recording vocals of each note to tape loops, and sending each tape loop to its own channel on the mixer. With each band member assigned to a handful of faders, the band then 'played' the part by raising and lowering different channels to create the progression you hear on the record. It's a remarkable achievement, and years later when "proper" sampling hit the scene, many other bands began sampling their own voices to create cool, new sounds that were at once organic and synthetic and yet still retained the character of the original singer's voice. Now, decades later, sampling has matured significantly and it's so easy to make cool instruments from your own voice that there's really no excuse not to try it at least once. I'm going to be going through this exercise in Camel Audio's superb Alchemy softsynth, as it is especially well-suited for this sort of task.
1. The first step is obviously getting a vocal recording. This is actually probably the most difficult part, because it's not really the same as recording vocals for a song. You need to pay much more attention to being consistent in your tone, getting a nice, long note, etc. So make lots of recordings. We're going after something synthetic sounding, so just single a single note will do, but do several takes of each, so you have something to choose from in case one option doesn't work.
2. Go through your takes, and find the one you think will work best. Ideally, you want something without much pitch wavering or vibrato. Crop the sample down so there is no dead space at the beginning and end of the recording. This next bit is optional, but I think it helps add to the synthy nature - If you have access to a pitch correction program like Antares Auto-Tune or Celemony Melodyne, try pitch correcting it and smoothing out any tonal inconsistencies. This'll help get us towards that synthy timbre we're after.
3. Bounce out your vocal sample tuned up and with a little compression to smooth out any problematic volume fluctuations. Make sure you save it to wherever Alchemy stores its sample data on your computer. On Macs this is in the Library->Application Support->Camel Audio->Alchemy->Samples->User directory. PC users, consult your manual, I'm not looking it up for you. :)
4. Source A should already be turned on, so click on the little window with the waveform name until a drop down menu appears. Select LOAD AUDIO and locate the voice sample from the USER list. Your sample is now mapped across the keyboard using the default GRANULAR ENGINE (be sure to experiment with the other engines as well).
5. The first thing we need to do is to set up the vocal sample for looping. So, select A from the SOURCE menu and select EDIT from the page that appears. The loop start and end markers are likely located at the very end of your sample, so find them and drag the start close to the beginning, but far enough into it that you are past the initial attack of the sample and into the sustaining portion. Bring the LOOP END back a little bit too, so it is also in the sustaining portion of your recording. Now change the LOOP drop down menu to read FORWARD/BACK. You can use the other options as well, but FORWARD/BACK looping usually creates the least noticeable results.
6. Hit The EDIT button again to go back to Alchemy's main page. Head down to the ENVELOPE section and adjust your ATTACK to around 5 seconds and the release to around 8.5 seconds.
7. You may already like the results at this point and decide you're done, but I like to make a few tweaks to the DENSITY and STRETCH settings in the upper left hand corner of the interface. Messing with these takes you a bit further away from the original sound and can make it sound a bit more synthetic. I found moving my DENSITY down to 3 GRAINS brightened the sound up a bit and gave it a very subtle grit. Bringing the STRETCH setting down to around 54% added a nicely ethereal "slow motion" quality to the sound.
8. Every good pad deserves a good reverb, so go ahead and hit the EFFECTS button, turn one of the slots ON and insert an instance of ACOUSTIC REVERB. Obviously the end result will vary wildly according to the source material, but you should have something like this:
Friday, July 17, 2009
Rolling Your Own Drum Sounds Part 7: Make a Hard Techno Kick in ES2
Logic's included ES2 synth is seriously underrated, especially given how old it is. I think a lot of people were put off by the kind of odd interface, and that's a shame because there is an amazing amount of firepower in this synth if you take the time to learn how to use it. Today, we're going to make a hard techno kick drum using ES2. Note, however, that you should be able to follow along with just about any modern virtual analog softsynth.
1. Create an AUDIO INSTRUMENT track and initiate an instance of ES2 in it. ES2 defaults to a very nice sounding synth sweep, but this is a bit far removed from the sound we're trying to create, so call up the preset CLASSIC HOUSE ORGAN from the 05 SYNTH KEYBOARDS folder.
2. We're only going to need one oscillator for our kick drum, so go ahead and disable OSCILLATORS 2 and 3 by clicking by clicking on the numbers next to each one until they go from green to grey. OSCILLATOR 1 is a simple sine wave, which is handy, because the lowly sine is the most useful waveform for synthesized kick drum sounds.
3. Before we get too far into this, let's deactivate some of the modulation routings we won't be needing. The MOD MATRIX is right below the OSCILLATOR section. In slots 2-4, go ahead and change the TARGET to 'OFF'. With that done, go to slot 1 and change the TARGET from CUTOFF to PITCH 1. This is telling ES2 that we're going to want to change the pitch of OSCILLATOR 1 with a modulator of some sort (the SOURCE). Right now it's set to ENV 2, but in the interest of keeping things simple, we're going to change it to ENV 1. ENVELOPE 1 is a simple attack/decay envelope which is very well suited for percussion sounds. If you play a few keys, you won't hear any modulation taking place. This is because you still need to set a MODULATION AMOUNT by using the green slider to the right of the SOURCE/TARGET window. Go ahead and set it around 89% of the way up. If you play some keys now, you'll hear a percussive 'chirp' at the start of the sound.
4. The sound doesn't decay like a drum, though. It still sustains like an organ. So go to ENVELOPE 3 (which is the AMPLITUDE ENVELOPE), and bring your S (for SUSTAIN) and TIME values down to 0. Go ahead and make sure the A (ATTACK) value is all the way down too. Set the D (DECAY) level to around 240ms and your R (RELEASE) value to around 350ms.
We're getting there, but it still doesn't sound like a big, menacing kick drum yet.
5. Part of the reason is because the pitch is too high. So go ahead and change the OCTAVE setting for OSCILLATOR 1 down to -36 semitones (3 octaves down). You should have something similar to a kick at this point, but totally lacking the nasty attitude.
6. Remedy this by cracking the SINE LEVEL (a suboscillator useful for adding low end to sounds) and the DISTORTION level all the way up. Set the TONE of the DISTORTION to about 50% to brighten it up. Make sure to turn the INTENSITY level for the Chorus/Flanger/Phaser all the way down too.
7. We're pretty close at this point, but you may notice an inconsistency in the punch of the kick each time you hit it. This is because the OSCILLATOR is in FREE RUN mode. This is useful for emulating old analog synths, but not so much when it comes to drum and percussion sound. To achieve the same quality every time, we need the OSCILLATORS to restart every time we hit a key, so select HARD from the little drop down menu located above the DISTORTION dial.
If you've done everything correctly, you should hear something like this:
Labels:
Drum Programming,
Drums,
Roll Your Own Sounds,
Tutorials
Thursday, July 16, 2009
Akai Challenges Korg's "Nano" Line
Looks like Akai is looking to take on Korg's 'Nano' products for laptop musicians with their recently-announced LPD8 and LPK25. They definitely LOOK higher quality, but we'll have to wait to see if they top the Korg stuff's sort of questionable-feeling construction. (Why is it that everything Korg has made in the past 10 years or so feels so CHEAP?)
Labels:
Akai
Wednesday, July 15, 2009
Interesting Demo of Damage Over-Cooking Your Audio Causes
If you've read this blog with any regularity, you've probably heard me bitch about the Loudness War, or the practice of bands and record companies pushing for louder and louder masters in the interest of being louder than their competition. The problem with this is that to achieve this end, you basically have to squeeze all of the dynamics out of it which, aside from sounding crappy, also fatigues the listener's ears. I've often wondered if this might be part of why people don't buy music like they used to - listening to all of this over-cooked audio is tiring out their ears and as a result, they don't listen to as much as they used to.
Anyway, there's an interesting article over on RecordProducer.com demonstrating another reason over-compressing your music to the point of clipping is bad: you're adding clicks and other artifacts to your audio.
Labels:
Compression,
Mastering,
The Science of Music
Tuesday, July 14, 2009
Wave Alchemy SFX Collection Vol. 1
Library: Wave Alchemy SFX Collection Vol. 1
Format: Download WAV, Halion, EXS, Kontakt, SFZ, and NNXT
Genre: Electronica/Dance
Distributed by: Loopmasters
Price: £44.95
Demo: On Product Page.
At the heart of it, dance music is all about the manipulation of energy. Effective dance tracks use different musical techniques to tease the listener with various builds and breakdowns, slowly upping the ante until the pedal hits the metal and the energy levels peak and much booty-shaking ensues. Learning to transition between these various energy levels takes time and skill, and these days, it usually involves some clever sound design as well. Much like a crash cymbal can act like the 'tape' joining two musical sections smoothly, in dance music rising synth tones, a gigantic sub drop, white noise sweeps, robotic time stretches, and the like can serve much the same function. They're great for lending a sense of atmosphere to stripped down breakdowns and drops, too. The problem is, however, it can sometimes be difficult to come up with new ideas for these creative musical FX, and even if you have an idea, what if you don't have the equipment or skill to make it sound as slick and professional? Have no fear, Wave Alchemy has your back.
Wave Alchemy SFX Collection Vol. 1 is a 1.5 GB collection of 24-bit sweeps, swishes, impacts, stabs, textures, and transitional FX specially tailored for use in dance music. All FX are sorted into categories such as Cymbal FX, Downlifters, Impacts, Short FX & Hits, Stabs & Acid Hits, Sweeps & Drones, Textures, and Uplifters. These are arranged into 9 ready-to-play sampler instruments for Kontakt, EXS-24, NNXT, and SFZ with a different sample on each key. This is great for auditioning different sounds quickly while you're working on an arrangement which otherwise can be a bit of a laborious process.
Various high tech tools were used in creating the sounds including the Eventide H3000 and the Sheman Filterbank, and it really shows. As with previous Wave Alchemy releases, the sound quality is unrivaled. There is a presence and clarity to these sounds that all but clobbers you over the head with how professional they sound. Obviously, you need to have a good track to begin with, but it is easy to hear how judicious use of these samples could definitely take your productions to that elusive next level. This isn't one of those collections where you get dozens of slight tweaks on a single ho-hum sound. There's plenty of variety and there are really no clunkers to be found, so it shouldn't take you long to find the perfect element to add to that remix you're working on. Just in that time-saving aspect alone, this is worth a look for professionals on a deadline who might not have an extra couple hours to muck around with convoluted chains of plug-ins trying to come up with something truly stunning to make that breakdown gel.
I'm not going to bother trying to describe the sounds themselves, as that can be difficult to transfer into words effectively, but it's safe to say that Wave Alchemy has covered all the bases for just about any type of musical FX the average dance musician might need. The unexpected additions like the stabs and acid sounds are really nice too and the quality and attention to detail on even these minor sounds is stellar. Even the most minor sounds still have a really IMPRESSIVE quality to them, and nothing seems like a phoned-in, lazy sound just to fill out the library. If you create dance music or remixes of any kind, you should consider this an essential purchase. And if Wave Alchemy continues to keep the standards as high in the future releases, they're a company you ought to be keeping your eye on. [10/10]
Labels:
Reviews,
Sample Libraries
Starkey Hearing Science Modular Synthesizer
More a piece of lab equipment than a traditional synth, but I bet it makes all kinds of science-y sounds!
Info at the listing...
Labels:
Rare Instruments,
Weird Instruments
Monday, July 13, 2009
"Back to Front": Rare Front 242 Documentary fron 1986
Via Mofukra on YouTube:
Some good gear porn throughout, although the video quality can make it tough to identify stuff...
Labels:
Electronic Music Pioneers,
Interviews,
Videos
Subscribe to:
Posts (Atom)